Friday, 28 September 2012

My First You Tube Craft Tutorial!

I suggest you have a chocolate biscuit in your hand and a cuppa nearby if you want to read this post!  You are gonna need sustenance!  I have written a novel!

I am sitting patiently waiting for my 11 minute video to upload to You Tube - I had no idea it would take so long.  I am impatient to press play and to see how it turned out....but since I am still waiting I thought I would write this post so I am ready to share it with you.......If it is decent!

Three days ago I started filming my first video - I wanted to show you how I made my blackberry and sugar stick embellishments.  Remember these two tags?


I got my camera working and filming in the correct format for my Mac and off I went!  It was a very strange experience talking to myself - making sure I stayed in shot and trying very hard to make sense!  I had to wait 24 hours for my blackberries and sugar sticks to set and then I recorded the final stage and viola video tutorial complete......

Nope - then I learnt how to get the tutorial off my camera and onto my Mac - easy peasy and then I had fun taking out all the fluffed bits of my tutorial and suddenly I am sounding a bit more professional.....I said a bit!!  I have to say iMovie makes the editing very easy indeed and I even managed to put on titles at the front of the tutorial and credits at the back even with a little bit of music.   I was pretty pleased with myself at this point..... big mistake!!!

Next I created an account on You Tube - no problem...... went to upload and the computer he say 'no chance!!'  After another round of reading and learning (which is all I seem to be doing of late) I realised I have to finalise my masterpiece in iMovie (2 hours of finalising later) I discover that it also has to be less than 15 minutes long and less than 2GB to upload it to You Tube........My finalised movie is 18 minutes long and 4 GB.   Oh no!  (it really wasn't as polite as that!)

Any of you recognising this scenario at all?  My hat goes off to all those crafters out there making video tutorials that's for sure!

Back to the drawing board - I decided yesterday to make another shorter tutorial - this time of a card I have blogged before that I designed to use up some of those ribbon scraps we all lovingly hang on to....just in case! :-)


No worries - Learn some more great stuff along the way:

1)  Make sure the house is quiet or you get much opening and closing of doors on your soundtrack!
2)  Leave gaps when you are filming so you can edit easier.
3)  When I edit I can fast forward myself so my viewer (if I have any!) doesn't have to watch me tie on a million ribbons or so!
3)  Must remember to take off the sound from any fast forward sections or you get chipmunk sound bites!
4)  I can add on screen notes - great if I fluff my lines!!

So once again I finalise my movie and right now I am publishing it to You Tube - still 2 hours to go - I hope my internet connection doesn't drop out!

So I will in effect be publishing my second video first....

I noticed something strange whilst making my second video - there is a huge difference in the two tutorials file sizes considering there is only a 5 minute difference in length.  I am going to try downloading the first file again before I make the decision to chop it into a Part 1 and Part 2 of my first ever video tutorial - Just a novice and making serials already ;-)


I have finished writing this (is that cheering I hear?) and there is one hour to go until I can learn what I hope is the final step:

Linking my tutorial to my blog so you can watch it - if you are still awake!


Thank you for staying with me and I would really appreciate any feedback you may have so I can perfect my technique.  I definitely need to buy a better rig as I think you need to see a little more of my desk.  When I do get the rig I am also going to try videoing from my perspective rather than from in front of me to see which looks better.

I hope you agree though that I did end up with a video that you could watch and have a go at making the Ribbon Rainbow Card!

Watch this space for the first video second :-)

Of to set up for video 3!  END TRANSMISSION X

Wednesday, 26 September 2012

Tag Tuesday - Clocks

I knew straight away what I wanted to achieve this week.  So here it is.............

My Tagfather Clock!!


It works too and I still have the strap of the watch to use on another project - waste not want not!  I had fun using the Ranger Metal Tape and alcohol and of course Tim's ideology too.  Watch from Derby and Silver metal flower from my pal Jo which she bought all the way from Singapore!


I coloured the pearl topper with alcohol ink and the faux enamelling was achieved with the same.


My pretty pendulum is an ideology charm with a couple of silver bells as counter weights.


Wanted to keep that tag shape and I think it has given my clock a slight Art Deco feel to it.  I really enjoyed embossing this metal foil product.  It makes me want to invest in some of the specialist tools out there.


Last photo - I really must learn how to make one of those wonderful photo montages for occasions like this!

WOYWW 173 - What a Grey Day!

No sunshine in my photo today - I have just done the school run and it is miserable out there.  Still I am now back and cozy with my craft blanket wrapped around me and ready to desk hop........well after I have posted this of course.  If you want to join in this hop - I promise you won't get out of breath - then follow this link to the gateway of hundreds of lovely desks to drop in on.


So carrying on from where I left off last week.  I have finally switched my camera on (yesterday) and hope to finish filming the last snippet of a very quick tutorial - how to make sugar sticks and blackberries or raspberries.  I managed to find the rig I need to get rid of the tripod off my desk and that was thanks to Vickie (aka okienurse).  THANK YOU VICKIE!  Your link led me to the right person to pose my dilemma to and yesterday they sent me two links to products so today I will see what the damage to my pocket will be ;-0


And the proper craft desk has the remnants from the Distress Ink clock I made this week which took forever!  The result of my crafting session yesterday which is to be uploaded for Tag Tuesday today (a smidgin late!).  Another clock as you can see, this time I had fun with Rangers Foil tape.  I love embossing into that stuff!!  It works too so I think I will keep it on my desk.  Oh and the remnants of a bag of Cashews......help yourself - I think you can just about reach :-)


Last photo is of the finished desk tidy I started last week now patiently awaiting tools!

Big Hugs to all who pop by to see me.  I love reading your comments and of course seeing what you have all been up to this week.

Monday, 24 September 2012

It's a Distressing Time........

I, like many other crafters I know and virtually know, love my collection of Distress inks.  I have lovingly labeled them and they sit before me everyday all nicely colour coded and ready for action!


As you can see I am also in the process of making a holder for all my foam applicators.  This I must hasten to add was not my idea but that of a fellow WOYWWer.  I didn't think at the time I thought ....'I want to do that'.... to make a note of their name so consequently I can't give proper credit here but if it was you and you happen to be reading this then please email me as I would love to give credit properly.

I say I am in the process of making my foam applicator holder because I do have a rather distressing problem!  As you can see I have 3 blank spaces on my holder on the right because I missed the Autumn Seasonals that Tim and Ranger brought to us.  I have been keeping my fingers crossed to see if they will be reissued but alas I have heard nothing so far.  How distressing is that!  I have an incomplete set of inks and a part finished storage project.......I know you feel my distress my fellow collectors out there ;-)

Anyway to cheer myself up a bit I decided last week to make a project putting my collection to good use.  At first thought I would use all my colours but upon reflection and after a few design decisions  I decided to select my 12 Distress Ink colours of the rainbow!


Look at those lovely labels!  This project is an homage to the wonderful colour pallet we collectors have at our fingertips everyday!  Whilst it is not a project that is in the slightest bit distressed, grunged or shabby I hope you like it!


Now I know that some of you may be thinking I could have done this with coloured paper and that is true but then I would not have had the pleasure of getting thoroughly inky whilst making my Distress Ink Rainbow clock.


This project did take a while as there is a lot of snipping involved but I am really happy with how it turned out.  I like the fact it is a bit arty and a bit sculptural and definitely bold!  If you would like to make your own clock then I will be posting a tutorial shortly so watch this space.

Oh....and just incase Tim Holtz happens to pass by (no laughing!) and just happens to read my blog and just happens to think there may be many more like me out there in blogland in the same distressing situation with an incomplete collection............please, please take pity on us (me) Tim and reissue the seasonals!!!  

What do you think my chances are!!!  ;-D  Don't ask, don't get right!!


Wednesday, 19 September 2012

WOYWW 172 - A bit of Sunshine!

Morning and Happy WOYWW to you all!  The sun is shinning on my desk today....well not so much on this first, soon to be TV studio desk, but on my get painty and inky desk below!  So today is the day I try videoing my first test tutorials - I need to get the frame right - the lighting right - the sound right .....etc, etc, etc!  I think I am going to have an issue with the fact that I can't get enough of my work area in shot with my tripod this way and I am pretty sure the cure is an attachment to put my camera on some sort of pole thingy but can I find what I want on the internet?.....nope!  Don't you think that sometimes you just can't phrase your google search in a way that finds the answer you seek?!  So that is 'some' of what I will be doing today.


And here are some other things I will be playing with - yay no google search necessary for this!  I am revamping a tool box to use on the desk above.  I have included a couple of pictures for you to scroll through if you are interested in the how I achieved what I hope looks like old paint work!!  People must think we craft folk are crazy - we want to make some thing new and fabulous but we want it to look shabby, grungy or distressed too ;-D

The canvas and piece of craft risist with the stamping on a bit further up my desk are to be transformed into a clock.  This design I dreamt up when I had trouble sleeping the night before last and it involves a lot of distress ink and paper weaving!


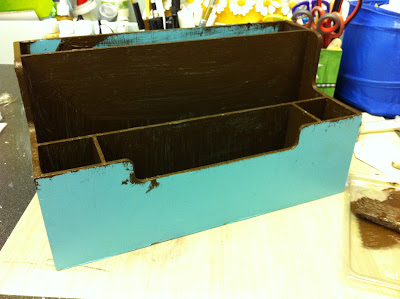
If you are still with me try speed reading and scrolling really fast for this quick how I did it!  Take one Ikea desk tidy from my son's room as he doesn't use it!  Paint all over with chocolatey acrylic paint.


This paint looks like dark chocolate and I haven't been trying to eat it - honest!  Getting in all those nooks and crannies is a messy job!


I decided that as this project wasn't easily covered with paper and I couldn't find any I liked for this project - I know, I know.... I have access to a 12 x 12 paper mountain and I just can't find the paper I want!   So a paint effect is in order.  Cover chocolate layer with caramel layer.


Then out with a foam stamp from a Making Memories set and on with chocolate drops!  Some perfect and ready for Cadbury and some ready for the seconds bags sold in the factory shop!


Then on with the distressing.  Rub all the edges with a mucky bit of baby wipe used to mop up chocolate paint and then a vigorous sanding down.  Look at my messy craft mat!!


All that is left to do is add some embellishments and fill with mmmmm...... shall I go for new tools or shabby well worn and loved tools? .... decisions, decisions.


Thank you for popping by to all my WOYWW pals and I will see you soon as I have posted this.  If you know not what WOYWW is then follow me (this link) to a world of wondrously creative desks and fab folk all brought together by Julia (Managing Director of a ton of crafty, inspirational, warm and friendly, down right nosiness!)

Tuesday, 18 September 2012

Tag Tuesday - Owls

Hi everyone on a lovely and bright Tuesday Morning.......It's Tuesday and I have a tag ready to post on time!!!!  At last I seem to have caught up with my Tag schedule ....touch wood.  I even have a design for next week ....how organised do I feel right now ;-)  Unfortunately I can't claim to be as organised in the dreaded housework area of my responsibilities - but I'm not gonna let that bother me too much.  I made banana muffins yesterday and I did some ironing first thing so I am fitting some housework in-between the crafting...gotta get my priorities right.  Not sure if the dust fairy would agree with me though! :-D

So on with the owl themed tag.  I was surfing the net looking at images of owls for inspiration and I found this fab image and knew I just had to decoupage it and make him fly from my tag.

I printed several copies out and cut my tag shape from one print and then I distress crackled the background area of the tag.

Next I embossed the edges of my tag with silver embossing powder and when I had built up a nice layer I added glass glitter and frontage flakes to the molten powder and I got this fab frosty and textured look which I know I am going to play with again.  Then it was on with the snipping to make my fabulous flying owl look more realistic.  I think I have RSI now from all that teeny tiny snipping of paper!  You can see on this photo how I chop up my image to allow me to create greater depth.


On and on went the snipping .....and on and on .......until I had an owl escaping from my tag ready to fly free.  I added a black frame to my tag and the quote seemed fabulously appropriate since I love Winnie the Pooh and this quote even mentions TUESDAY!!!!


Here is a bit of a closer shot so you can see a bit more detail (I hope!!)  Pretty green and silver fibres and some wired crystals to continue the frosty theme and a silver owl charm finishes my owl tag.  Oh almost forgot three tiny dots of glossy accents on my owls eyes and beak and definitely finished!  See how the sun is shining through my window - what a nice change that makes.


Big hugs to everyone that pops by and if you love owls or/and tags then follow this link to Tag Tuesday for more owl inspiration.  It will be a hoot!  (sorry couldn't resist)  Why not join in the fun?

Wednesday, 12 September 2012

WOYWW 171

First of all today I want to thank everyone for their wonderful well wishes to Callum last week.  He is back at school and went to see his fellow gymnasts tonight so he is definitely on the mend.  He has an X-ray on Thursday to make sure all is healing in the right places.  I can't believe it has been two weeks already!


Here is a shot of my very tidy desk (shelves not quite so) with the mini sewing machine I have been playing with this week, my next tag for Tag Tuesday (first stage) and I have hidden the design on another tag with a photo of me and Callum when he was about 4 - bless!  Frames are still not finished and I am no further with the 101 Chemistry course but I have bought a few more bits for some of the lessons!!  So the pile of Tim and Ranger goodies is growing.  Talking of Tim Holtz........


My friend Deb gave me another set of the clear drawers and Hubby put them up for me this weekend.  I have filled them with Tim goodies!  I have taken down most of my tags ready to display them next door.  At the rate I have been making tags lately I will need more space!

And finally I am going to reveal the scariest part of my craft room.  Think deep dark and forgotten space.  Once you are in there you never come out!  Be afraid, Be very afraid........I am thinking I should have showed you this in a couple of weeks time really!


I bet you thought I was going to show you my ironing cupboard!!  But no it is the corner cupboard.  Well it would be if it had doors!!  It is the place where craft stash goes and is never seen again.  One day I really will climb in and pull everything out......one day ;-)

That's it from me my fellow WOYWW desk hoppers.  I am hopping off now to see what deep dark secrets you are going to reveal today!  If you are thinking 'has this bird completely lost the plot?' then you really need to follow this link to see I am not alone!!  There should definitely be a crazy cackling laughter sound effect about now ;-D

Tuesday, 11 September 2012

A Bit Wibbly Wobbly!

Here is card number 2 made using my mini sewing machine that I finished two nights ago.  I wanted to take the photo in daylight and I forgot until today!  I tried my hand at sewing a straight line with my little sewing machine this time and it is a little hit and miss.  It is ok but I think I will stick with the deliberately wobbly wobbly look from now on!

I even sewed the strip of ribbon on with my little sewing machine.  I had to guide it through a bit but it seems to have worked.  I have been looking at some awful reviews on this machine of mine on the internet as a friend asked me where I got it and it was so long ago I thought I would look to see if they still make it!

I was saying to her that from the look of the reviews I found on line I have the magic one that works for a change rather than the only one that doesn't!!  Yipee - Mind you I am going to try changing the thread next so it could all go terribly wrong.

I have decided not to add a greeting to this card yet so I can personalise it when I have the occasion to send it.


I have a layout still to share but I want to get the journaling finished first so to quote someone I definitely don't think crafts at all 'I'll be back!'

Just terminating my post now then!!  ;-D couldn't stop myself tee hee!

Tag Tuesday - Autumn Fruits and Berries

When I thought about doing this tag I knew straight away I wanted to do blackberry but I was torn which definition to go for (phone or fruit) as you know how much I like a construction project!!  Then I remembered making the sugar sticks a few tags ago and I knew that I could make blackberries using the same technique.  I showed you them on my last tag post as I made them yesterday so they would dry in time for me to use today.  I know the glass balls I used to coat the pin flair glue gel with make my berries look more like raspberries but I coloured them with alcohol inks to look like blackberries.  So today I was ready to make my tag:


Here are a few photos of the process I went through to make my tag for this week:


I chose a blue patterned paper to become the sky to set my blackberry bramble against.  I made a bramble sprig by wiring together some silk leaves I had stashed away.  I had to make a trip to my local florists to see if they had any tape I could buy to wind around my wires to make them look presentable! Brrrrrr - It is cold out there today - I think Autumn will soon be here!

I made little green.......I don't know what these things are called but they sit on the top of the berries!  Back in a moment - going to Google it..........after many differently worded searches it is the same as a flower has - Calyx!  I doctored flowers that I punched from green card to get these.  I trimmed all the petals so they would be narrower and that did the trick.


I have attached my berries and have left some room to include some blackberry flowers - off to hunt through my paper flower collection......


I had some white paper flowers that were pretty close to size and shape so I added a touch of pink and then blob of silicone to attach each flower to it's calyx!!  Then I dipped them into some golden and black micro beads of glass.  How real do they look!!????


I found the perfect quote to finish my tag.  Especially considering what I was thinking as I started designing this tag.  Here is a close up.  No one is allowed to pick these blackberries!

Each week there is a new theme to inspire lots of wonderful tag art over at Tag Tuesday.  Why not pop along to see what the fruits of our labour has produced!!!!

Monday, 10 September 2012

Tag Tuesday - Circus

Here is my tag for this weeks Circus theme.  I was originally thinking of doing a knife thrower tag with a spinning wheel but then I saw this image from Cirque du Soleil and I just could resist.  It bought back happy memories of the two fabulous shows we have been lucky enough to go to.


I printed out several images so that I could layer them up.  The first one I cut into my tag shape and added an acetate layer so that the reflection looked even more realistic and it has worked a treat.  I added a yellow border and lots of pink bling for dramatic effect and then I got on with the layering up.  It was actually a great image to make 3D.  Her pose is perfect for it infact.  I made her tutu out of Tim Holtz roses that I sprayed with orange, yellow and pink Dylusion sprays.  I made real shoelaces and added knots of thread to her hat and then I cut some yellow paper into really narrow strips and made a pom pom explosion for the top of her hat.  I added just a touch of glitter and I enamelled the Cirque du Soleil logo and my word strips - they are not quite dry as you can see from the photo but it is getting late!!!!


Cirque du Soleil are a wonderful company.  They make magic on the stage with fabulous stage sets, costume, music, lighting and not forgetting extraordinarily talented acts.  They transport you from the every day to a slightly crazy but definitely fabulous and wondrous world.

I am trying to get a head start on my other tags though I am not sure if my blackberries will be dry in time for me to post tomorrow.  Here is a sneak peek. Remember the sugar sticks I made with glass beads.......

I just need to work out what to do with them now I have grown them!!  Getting them off their sticks is going to be a bit of a faff!

I am going to see what everyone else has been making this week......coffee in hand of course.  Follow me to Tag Tuesday if you are reading this on my blog.

Sunday, 9 September 2012

Used at Last!

Had to share this with you.  Some of you may remember when I was tidying up recently I found a little sewing machine I had bought a long while (years) ago sitting forgotten at the back of a shelf.   It was pristine and unloved.  No longer.... after one false start where I took it to a crop to have a play with but forgot one little but important ingredient - batteries!!!  I finally got around to using this cute little sewing machine.


If you too have one of these lying idle forgotten some where then this may just get you hunting for it.  I had real fun with it.  It has it's limits and does make you think that you would like to do this on a grown up sewing machine but at a crop and for portability I loved it.  I forgot my instructions so I used the white thread only but I think it worked for the things I did.  I found only a couple of draw backs.  The main one was the fact you are limited how far into a piece of card you can work so you have to think about it when you are designing your project.  The second is that it stitches a little chain stitch which means that when you stop sewing if you are not careful you can unravel things.  Once I got the hang of that I was ok and I made sure to add a bit of glue to the finishing threads at the back of the card to keep them in place.........and final point for a little machine it is quite noisy as the girls at the crop will attest to!!


I will post a couple of projects I made with the tiny sewing machine over the next couple of days.  Here is a card I made and I sewed a random wiggly machine stitch border to frame my card and over a couple of squares of paper that I attached as a design element.  I would have liked to stitch my flower motif but that is how I discovered the limit to the machines reach.  I think the hand stitching with embroidery thread worked though and probably draws the right amount of attention to the flower detail of the card.

I was quite pleased with this simple card design and have another card and layout almost finished so watch this space.  I might even read the instructions to change the colour of the thread!  Hope you are having a lovely weekend - I am off to sit in the sun for a while ;-)

Thursday, 6 September 2012

12 Tags of 2012 - September

Is there a Tim tag or technique I haven't liked? - NOPE!  But this one was particularly fab to do.  It is a great technique using Foil Tape Sheets by Ranger to make a wonderful industrial look.  I know I am going to use this for the boys but that is not the way my tag went!  It definitely went girly........


Which is a little strange I know.  I started off following Tim's Tutorial (follow the link for a master class).  I did cover my tag entirely with the foil sheet and I decided to use grunge paper for my base tag as I thought that when it came time to emboss it would give a little when I pressed into it - it was perfect in fact.


Next I added random strips of metal foil and decided to add a few circle punch shapes - the foil punched easily.  I even used the holes!


Next for the fun part of embossing an industrial pattern.  You can get special tools for this but I used my bone folder, ball tool and the ball point pen that Tim showed us how to use to make faux rivets - Cool.


 I loved the embossing and as you can see I went to town!  I had no black alcohol ink so I tried a bit of black acrylic paint first and but it was no good as it rubbed off entirely when I sanded it and then I spotted a permanent marker in my tool box and it worked a treat.


As I had no wire wool I used a piece of sand paper to remove some of the pen and to reveal all the embossing.  I was a little worried that I would be squishing all my work flat but nope - Love it!


Now to embellish!  I love using printed paper so that was a must element for me and then it all went girly from there.  I made these flowers with bits of old earring that my friend Jo bought back from Singapore especially to use on craft projects.  Thanks Jo!  Then some small flowers cut using Tattered Florals and all held together with a silver brad and a washer.  When I used my ink blending tool to add some Black Soot Distress Ink to my flower petals they curled up a treat - Happy accident :-)


This is the point where I forget to take photos as I really get stuck into sorting through lovely stash and trying this and that until I get the look I want.....I know you all know what I mean!  The point when your work space shrinks to....well in this case, the size of a tag!


Almost there I think.  More flowers added this time with just paper and an enamelled number nestled in.  Some metal flower brads I have had forever and a clock hand which I coloured with a permanent marker threaded through a round word charm.


And here is the aftermath.  Is it that time again.......Oh well I will finish this post first and then get on with it as I need to make room to make my Circus Themed tag for Tag Tuesday.


Extra goodies I added from my stash were Prima Bling I have had for ages - bought in America and lovingly stored for a couple of years!!  A pearl drop and chain tassel from Tim's Ideaology that I dangled from some black cord.


I added a couple of word stickers that I glossy accented to make them look like epoxy ones and some aurora borealis gems to the centre of the flower brads.  And that's it job done and mess made!

I am wondering if next months tag will be Halloween.....ok wishing it will be!  Am I wishing the month away already ;-)  If you love making tags then why not try out Tim's great 12 tags of 2012 Challenge.  Thanks for popping by.   Now what was it I was going to do next?............it escapes me :-D
Related Posts Plugin for WordPress, Blogger...