Wednesday 26 February 2014

Beautiful Scraps

Hi there,  I hope you are all having a fun week.  Our weather seems to be giving slight hints that spring might finally be on its way which as I listen to the birds singing outside reminds me we must get our hedge cut before the birds start nesting.  The hedge has gone a bit wild and if we have to leave it a couple of months our garden will be considerably smaller due to the width of the hedge!!!!

Today I am sharing another video tutorial and I hope it inspires you to look at the scraps you have left from a project and to make a card with them rather than store them away!

Here is my project which is a scrapbook page:


As you can see I used some gorgeous Graphic 45 Papers, namely 1 sheet of Happy Hauntings Enchanted Garden paper and 1 sheet of ABC Primer (also called ABC Primer!)  I also used a sheet of Black and Green Bazil that coordinated with my patterned papers.  This is quite a simple layout and could be made using any patterned papers you have in your collection.


As I wanted to keep the focus on this lovely photo of my son Callum and our friends daughters Kereagh, Stephanie and Hannah with sunflowers towering overhead I created a pocket behind the photo to hide the journaling and a couple of other images of the lovely day we spent together in the sunshine. Using a single photograph on a busy patterned paper means one does not overpower the other.

So once I had created my scrapbook page I had some lovely left overs to play with and that gave me the idea for this video tutorial.


I really enjoy the challenge that using pretty paper scraps brings with it.  You only have a certain amount of paper to play with so your design needs to be adaptable.  I wanted to share a tutorial featuring a double easel card so that along with my pretty paper scraps was my starting point.


And this was my finishing point - one pretty layout with matching card!  Why not try this out for yourself.  There is no tutorial for the layout but I am going to give you the dimensions as I am sure it is easy enough to work out and I have also included the cutting guide for the card below.  Substitute two patterned papers for my sunflower and tartan ones.  It helps if they will be complimented by one sheet of black card stock and then pick one coordinating colour to replace the green and you have all you need with the odd embellishment, strip of ribbon and a greeting stamp thrown into the mix.

Scrapbook Layout Materials:


2 sheets of Green 12" x 12" Bazzill (one is used for the card)
1 sheet of Black 12" x 12" Bazzill
1 sheet of Graphic 45 Happy Haunting, Enchanted Garden
1 sheet of Graphic 45 ABC Primer, ABC Primer

Scrapbook Cutting Guide and brief directions:

Bottom Layer Black Card 12" x 12" carefully remove the centre leaving a 1/2" frame

Second Layer ABC Primer Paper 11 3/4" square  carefully remove the centre leaving a 3/4" frame

Third Layer Green Card 11" square

Forth Layer Enchanted Garden Paper 12" x 6 3/4" angled across green card stock and trimmed to fit - approximately 3/4" from bottom left corner and 1 3/4" from bottom right corner of green card stock - trim away excess paper to fit green square.

Pocket first layer Green 4 1/2" x 6"

Pocket second layer ABC Primer 4 1/4" x 5 3/4" remove centre leaving a 3/4" frame

Photograph 3 1/2 x 5 1/4" framed using the strips of green card removed from 11" square

Tag Black Card 3 1/2" x 6 3/8"

Back of tag ABC Primer 6" x 3"

Use a 1/2" strip of the reverse of Enchanted Garden paper to decorated the top and bottom of the front of the tag and use the remainder folded in half to make a pull tab for the tag

Use a 1/4" strip of ABC Primer also on the top and bottom of the front of the tag to decorate.

Pocket was raised using 1/4" strips of other scrap card to create room for the tag.  Check out this video link to see how this is done.

Fussy cut 4 sunflower head and 6 sunflowers with leaves and stalks to embellish - Alternatively look at the papers you are using and fussy cut elements from them or use other embellishments in these areas.

Cut one title from black card stock - alternatively use letter stickers or stamp the title.

Cutting Guide for Card:


Card Base - Green Card 12" x 6" in landscape position score at 6" and 9" rotate into the portrait position and score at 4" up to centre scoreline.

Green Cardstock:

2" x 6" and 4" square

Black Cardstock:

1 13/16" x 5 13/16", 3 13/16" square and 3/4" x 5 13/16"

ABC Primer:

3/4" x 1 13/16", 3/4" x 3 13/16" and 3/4" x 5 13/16"

Enchanted Garden (Sunflower)

3/4" x 5 13/16"

Enchanted Garden (Leaf)

1/4" x 1 13/16", 1/4" x 3 13/16" and 1/4" x 5 13/16"

The greeting I used was from Creative Expressions Natures Sentiment stamp set.

I hope you are inspired to play along and to use up some of the pretty scraps I know you have been making!  Here is the full video tutorial for the Double Easel card.


I have a very busy couple of weeks ahead of me and this project is a bit of a hint!  Sssssshhhhh!  I'm keeping it under wraps for now ;-)  What a tease…..

Have a lovely rest of the week and thank you for popping by X

Wednesday 19 February 2014

WOYWW 246 - Is it Wednesday again already?

Thank you to MaryAnne for reminding me what day it is with her fab share today that popped into my in box this morning.  I am definitely going to try making my own modelling paste so a big thank you for sharing x

Here is my desk photograph for today.


From left to right we have a peek at one online workshop project awaiting more embellishments - that is what the glue gun and the patterned paper and the leaf die on my guillotine are for.  Glossy Accents and Cosmic Shimmer Pearl PVA have just been used on the workshop project.

The lego card was the result of a tutorial I shared on You Tube yesterday which is now a bit wrinkly as I spilt water on it!!!!  ooops!

The box has some Tim Holtz Stencils and Distress Paints inside that need unpacking.

You can see my red handbag and some rose trim that needs putting away as I didn't need to use it after all just at the far end of my desk…....

……….And last but not least standing up behind the blue bin are some My Minds Eye Chalk Studio papers and embellishements and there is a layout in there waiting to be finished off.

I'm off to have a little snoop around your desks now before we take the dog for a walk by the river.  I wonder how high it is today?  It has flooded areas of the golf course and Comet loves it as they are the perfect huge puddles of water for a dog to charge through!  I swear it makes him smile.

Wishing you a wonderful WOYWW (and if you don't know what that is then to find out what you are missing pleas click here!!!)

Thank you for popping by X


Tuesday 18 February 2014

Let's Build a Card Together!

Here is a fun card tutorial for you.  I wanted to do a class with designs suitable for the boys in your life. I loved how this lego card turned out.  Mainly because I love Lego!!!!


It was easy to do and when I thought about it, it was more versatile than originally intended as with a few changes of colour it is great for the girls too:


For anyone popping over from the video tutorial here is the Card Cutting Guide as promised:

Card Cutting Guide:

Card Base - 11 1/2" x 8" scored and folded at 5 3/4"
Black Card (Front and Inner if stamping own greeting) 7" x 4 3/4"
White Card  (Front and Inner if stamping own greeting) 6 3/4" x 4 1/2"
White Card (Greeting if stamping own greeting) 2 1/2" x 1 1/2"
Black Card (Greeting) 2 3/4" x 1 3/4"

Lego Cutting Guide:

Large Lego Blocks 3/4" x 1 1/2"
Medium Lego Bricks 3/4" Square
Small Lego Bricks 3/4" x 3/8"
Single Lego Brick 3/8" Square

Lego Colour Guide:

Large Lego Bricks:

1 Red, 3 Yellow, 2 Blue, 2 Black

Medium Lego Bricks:

4 Red, 1 Yellow, 1 Black, 3 Blue

Small Lego Bricks:

1 Yellow, 1 Black, 2 Blue

Single Lego Brick:

1 Yellow

Here is the link to the free tutorial which is over on my You Tube Channel:


If you want to use the same greeting and inner that you see featured on the video I would be happy to send you the file.  Just click on my email link on the right hand side bar of my blog and let me know so I can send it to you.

Don't forget to subscribe here and on my You Tube Channel (if you don't already!) for more tutorials coming your way soon!  I'd love to have you join me.

I hope you find this design useful next time you have a birthday card to make for someone that loves Lego!

See you again soon and thank you for popping by x

Monday 17 February 2014

Christmas - Starting Early!

I know, I know the C word already!  I wanted to share something with you and give you something to think about that is a fun project to make for Christmas 2014!

As you may know I have an online workshop for a Tag Storage Project (see my left hand side bar).  At Christmas I taught a workshop that used this design to make a fun advent project.  There is a free idea tutorial on my You Tube Channel that assumes you have purchased the workshop so you can make the Tag Storage Unit in Christmas papers and then I show you how to make the Advent Tags on the free Video.

I taught this project in a real live workshop at the end of last year and I was delighted by the gorgeous tags that were being turned out.  I want to share with you the work of two of my friends and to show you their fabulous Christmas Advent tags so you can have lots of inspiration if you decided to purchase this on line workshop and make a Christmas Tag Advent Calendar for yourself.

The first photographs are of Deb's tags:


Look at all that gorgeous detail.  I love the jewelled baubles and the cute Christmas tree!  This was a Tim Holtz style tree cut in half!


Deb's tags are going to look fab every year and I know her Grandchildren are going to love seeing them each day.

Here is Julie's Tag storage unit all finished and looking gorgeous!  I love the beautiful lace trim she has used and I am definitely going to look out for something similar so I can do the same!


Here are Julie's lovely tags - each one a mini work of art!


Those mittens on strings are soooooo cute!


My friends have now inspired me to add some more Christmas loveliness to my tags too!


When I saw Julie's and Debs finished projects I knew I just had to share them with you all.  I know you will forgive me mentioning the C word now you have seen what my friends have created.

Thank you Deb and Julie for letting me share your Advent projects I love them and you have inspired me!

If you want to purchase your copy of the Tag Storage project you can either do so from my Left Hand side bar or you can follow this link to my ETSY shop if you would prefer.

Here is the link for the basic Advent Tag Video and if you share what you come up with don't forget to let me know so I can send other Advent Tag folk over for even more inspiration.

Have a lovely evening and I will see you tomorrow with a Card Tutorial that started out as a design for the boys and ended up as one for the girls too!

Thank you for popping by X

Thursday 6 February 2014

12 Tags of 2014 - February

Don't Faint!!  Yes I have manage to do my February tag and video early!!!  It seemed silly to tidy every thing away when I could just carry on tag making as Tim posted his February tag the day after I posted my January one!

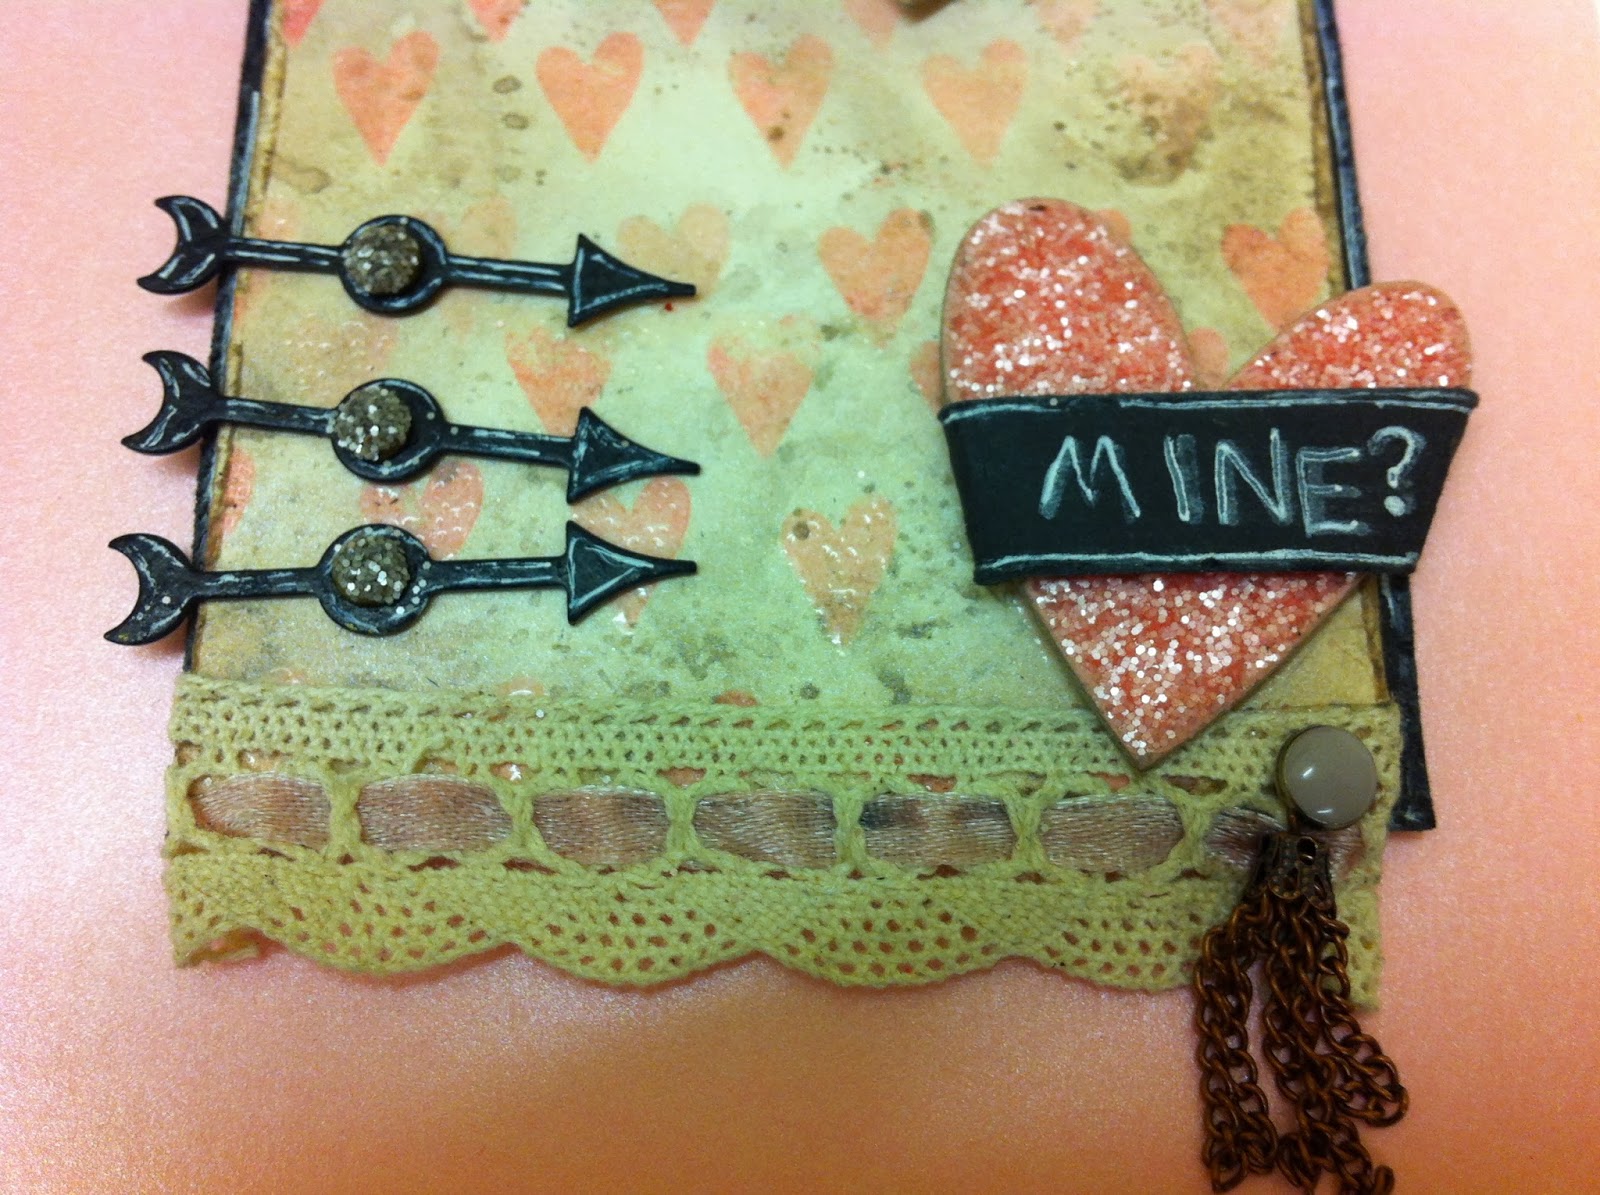
This one is definitely romantic.  Once again I didn't have some of the products Tim used - I do not have the heart stencil yet but is is on my list for when it is available in the UK!!!  In the mean time as you will see on my video I had a go at making my own heart stencil.  I decided to go with pinks rather than reds as I only had Spun Sugar Distress Glitter.  It almost looks good enough to eat!  I still don't have the embossing powder to do the chalkboard technique but I had a go at recreating the look my way.  I hope you think it works.


Even though the Spun Sugar Distress Glitter is fab my favourite is definitely the Pumice Stone.  I love the minky tones.  I am sure I will be using this one a lot!


I know chalkboards don't come in ribbon shapes but I needed to exercise some artistic licence to make my design work!

If you want to see how I got from Tim Holt's inspiration to my interpretation then please feel free to press play on the video below!  Don't forget to subscribe if you like this video as I will be making one video for each of my tags again this year.


All that is left for me to say this evening before is that if you like making tags or want to make tags or if you love a challenge then you really do need to pop along to visit Tim Holt's blog to see what everyone that plays along gets up to each month.  I can't believe it is the third year of this challenge already!!!  Time Flies when you are Creating!!!!!

And one final photo of the mess I made!


Have a lovely day and thank you for popping by X

Wednesday 5 February 2014

Scrap That!

Hi everyone,  Today I thought I would share an idea for pretty scraps.  I started out with a couple of lovely papers from My Minds Eye - The Sweetest Thing by Jen Allyson which of course I made a 12" x 12" layout with a couple of weeks ago:


As you can see it is now waiting for a Photograph and a title with an embellishment or two to complete it.


I still wanted to make the most of these pretty papers so I decided to make a complimentary Project Life style page - definitely a great way to use up scraps.  Plenty of room for more photos and journalling.  I am thinking that Black and White Photos will look great against these papers.


As I was tidying up I came across these pages from a couple of weeks ago and I decided to make the most of the small scraps of paper and the embellishments I had left and set too making a card this afternoon.


I thought I might make a patchwork as a background for my card as all my scraps were quite small.


Then I needed a focal point for the card so I pieced together some scraps and use my score board to make a rosette.  Sorry about the slightly mucky score board!


I had these embellishments to play with so…….


One rosette with a cute bumble bee brad was the end result!


I mounted the panel onto a sunny yellow card - Bee Happy!


A little bit of stamping and some more patchworking of the ever decreasing pieces of scrap paper and the finished inside of the card makes this one I will be able to use for lots of occasions.


I hope this gives you some ideas for your smaller scraps of patterned papers.  I am just wondering looking at these photographs wether to do some faux stitching to complement the patchwork effect……..

So what is left? - not much paper but I am going to keep it until I put photos on those layouts…. Just in case!


I have a feeling that there will be a few brads and stickers left over but I know they will come in handy for other projects in the future - feeling very thrifty right now!

Thank you for popping by X

G 45 Mother Goose Meets MME Chalk Studio in this lively layout.


This photograph of Callum enjoying himself at the funfair was full of colour and was a little tricky when it came to matching it to the right scrapbooking papers.

I loved the colours of the Graphic 45 Mother Goose Papers and I think that by using them sparingly and incorporating black with a few My Minds Eye Chalk Studio embellishments that the photograph is complimented by the papers rather than overpowered by them.

I had fun trying some hand lettering for my title and I hope you think it works well with the Chalk Studio elements.  A bright and cheerful layout of a fun Summers evening spent enjoying all the colours sounds and tastes of the La Linea fair in Spain.

This fair is sited right on the border with Gibraltar so it was only a short walk from our house and we always had great fun staying up late.  A real fiesta family atmosphere.

Thank you for popping by X
Sunday 2 February 2014

12 Tags of 2014 January Video

Hi everyone.  Hope you are having a fun Sunday.  We have had a lazy morning and are thinking about having some brunch.  I thought I would post this as it finally uploaded to You Tube last night.

Here is the video to go with my January tag for 12 Tags of 2014.


I hope it inspires you to play along with this fun challenge.

Enjoy the rest of your weekend and thanks for popping by X
Related Posts Plugin for WordPress, Blogger...