Showing posts with label Challenge. Show all posts

Wednesday, 1 April 2015

Rubber Dance April Colour Challenge

Hi Everyone

Today is the start of a brand new colour challenge over on the Rubber Dance blog and there are gorgeous stamps to be won!!!

The colours this month are Rose Pink, Dusky Grey and Powder Blue and there is an optional theme of texture.  I decided to start a brand new art journal and was inspired to create a page using two lovely Rubber Dance Stamps.  I use Lace as my background image so it was a perfect way to start building texture on my page and I used the large butterfly stamp from the Antique Botanicals set to enhance my background and to make a couple of fluttering features on my page.  Hope you like it.


There are lots of ways to add texture to a project - I have added jewels, stitching and layers of paper and the tiniest touches of distress glitter as you will see on the video tutorial.


I have decided this art journal is all about exploring how different products work with each other and this time I used Gesso, I stamped with Archival Ink and I used my Faber Castell Pitt pens to bring colour to my page.

I hope I have inspired you to play along with us over at Rubber Dance this month.  Just follow this link to see all the other inspiration from my fellow teamies.  I am always amazed at how many different directions each colour scheme inspires.  I look forward to seeing what you create.


I think you can see all the elements I used to create texture on my page in this close up!  Two video tutorials in two days!!!  I am off to put my feet up now ;-)

Have fun over at the Rubber Dance Blog - don't forget to check out all the lovely stamps while you are there.

Thank you for popping by X

Saturday, 28 June 2014

Scrap Around the World June Challenge

Just a quick post to share a layout inspired by the June Challenge over at Scrap Around the World:


I really love the colours of this one and I happened to have a photo that suited the mood board perfectly….So colour and LOVE was my inspiration.  I used a photo that was taken, I thought, by me and the more I think about it, the more I seem to remember a friend might have taken it and it was their printer that ran out of ink…..It was a little while ago now as Callum is 15 so…….maybe the friend will remember if it wasn't me and let me know!!!.  Either way it is true…... I LOVE this photo and the little man in it and part of its charm is that the ink started to run out on the printer!


I had fun with this layout using lots of different techniques.


I got some of my new stencils a little bit painty!!!  I used distress paint instead of ink to define my edges.


As usual I cut a section from my base card stock to create a mat for my photo….waste not want not…...


I covered 2 chipboard arrows with the reverse of the grey paper and added more stencilling with my favourite dot fades.


Trying to break out from my normal scrapbooking habits I heat embossed the pattern on the grey paper with black and pewter embossing powders using a combination of my Perfect Medium pen and my quickie glue pen.  The quickie glue pen worked really well for those fine pewter lines.


The photo was added next…look at that cute little face….don't you just want to pinch his cheeks!!!!  Good job Callum won't read this ;-)


I found some hearts in my little box of chipboard and unused die cuts ( a moth flew out when I opened that tin!!!)  I added pewter embossing to the heart and slightly outlined some of the dots on the arrow.  A couple of found die cut flowers and that made the nice little arrangement top right.


Bottom left was where I placed the title which my friend Jo cut out for me with her lovely new cutting machine.  Look how fine it cut everything.  The big flowers was hand cut from a yummy Heidi Grace paper I have had stashed away carefully since forever!  The top flower has a flock finish to it.  The 100% original brad was painted with Distress Paint as it was cream and didn't stand out enough.  I rubbed it over with sandpaper to reveal the wording once the paint was dry…….One more step…..


….Yes that 'might not be quite true journalling'…….I think I might add PTO and write the full story on the back of the layout….I might even get a call to tell me what the true story truly is ;-)!!!!


So that is how I got to here!  It was fun trying new things and I hope you pop along to Scrap Around the World to check out all the lovely Mixed Media layouts inspired by the gorgeous mood board at the top of this post.

Hope you are all having a fab weekend….I am off to a crop tomorrow so I really must get my bags containing everything but the kitchen sink ready to avoid the early morning rush!!!

Thanks for popping by X

Saturday, 3 May 2014

Dandelion Wishes

Hi there, hope you are enjoying a weekend of crafting and happy times.  I am posting my challenge piece for the Simon Says Stamp Challenge where Anna-Karin challenged us to be inspired by Yellow! I am a fan of warm golden yellows and it was fun coming up with a project inspired by this theme.  I was looking through my stash and came across some Wendy Vecchi Wildflower Art Parts and I knew I wanted to celebrate the humble and much maligned Dandelion!

I have made a video of my creative process and I hope it will inspire you to create a home decor piece of your own.  Check out all your chipboard, die cuts and art parts and see what you can come up with.  It is a fun way to spend an afternoon ;-)


Here is my finished piece.  I think this is a happy piece and I think the use of the sunny yellow is what makes it so.  As a child I remember we teased anyone that touch a dandelion that they would surely wet the bed!  I have no idea why - I think I may look it up…….And I am glad I did!  Apparently there is some truth in our childhood games.  There is something in the leaf of a Dandelion that stimulates the bladder.  For more information and a really fun read follow this link to find out more about this interesting weed!

My hubby spends time in the garden digging out Dandelions so they don't invade the lawn!  I am pleased to say he doesn't eat them ;-)

I personally like the Dandelion for the Dandelion and Burdock drink that we have here in the UK and for Dandelion clocks!  I think crafters love them as there are plenty of stamps out there celebrating delicacy and the beauty of the fluffy seed heads.

I have encapsulated some to the seed parachutes in a little glass bottle to finish off my project.  It was an idea I had seen on Pinterest originally and I am so pleased that I have managed to use it on this project.


I did get to thinking…….what if one of these wishes is the one that grants me a Lottery Win?!……..hmmmm……..better keep them somewhere safe!

So that is my challenge piece and one pretty home decor piece that has a fun story.  I hope you like it and that you watch the video to see how I created it.


Don't forget to pop along to Simon Says Stamp to check out all the other lovely projects inspired by the colour Yellow.

Have a fabulous weekend and thank you for popping by.

PS Don't forget to subscribe if you like my art and want to see more X

Sunday, 9 June 2013

Shadows and Scissors

Six hours and 48 minutes left in the Simon Says Stamp and Show Challenge this week!  I don't know where the time has gone????  I seem to be saying that a lot lately.  Did someone fast forward time? ;-)

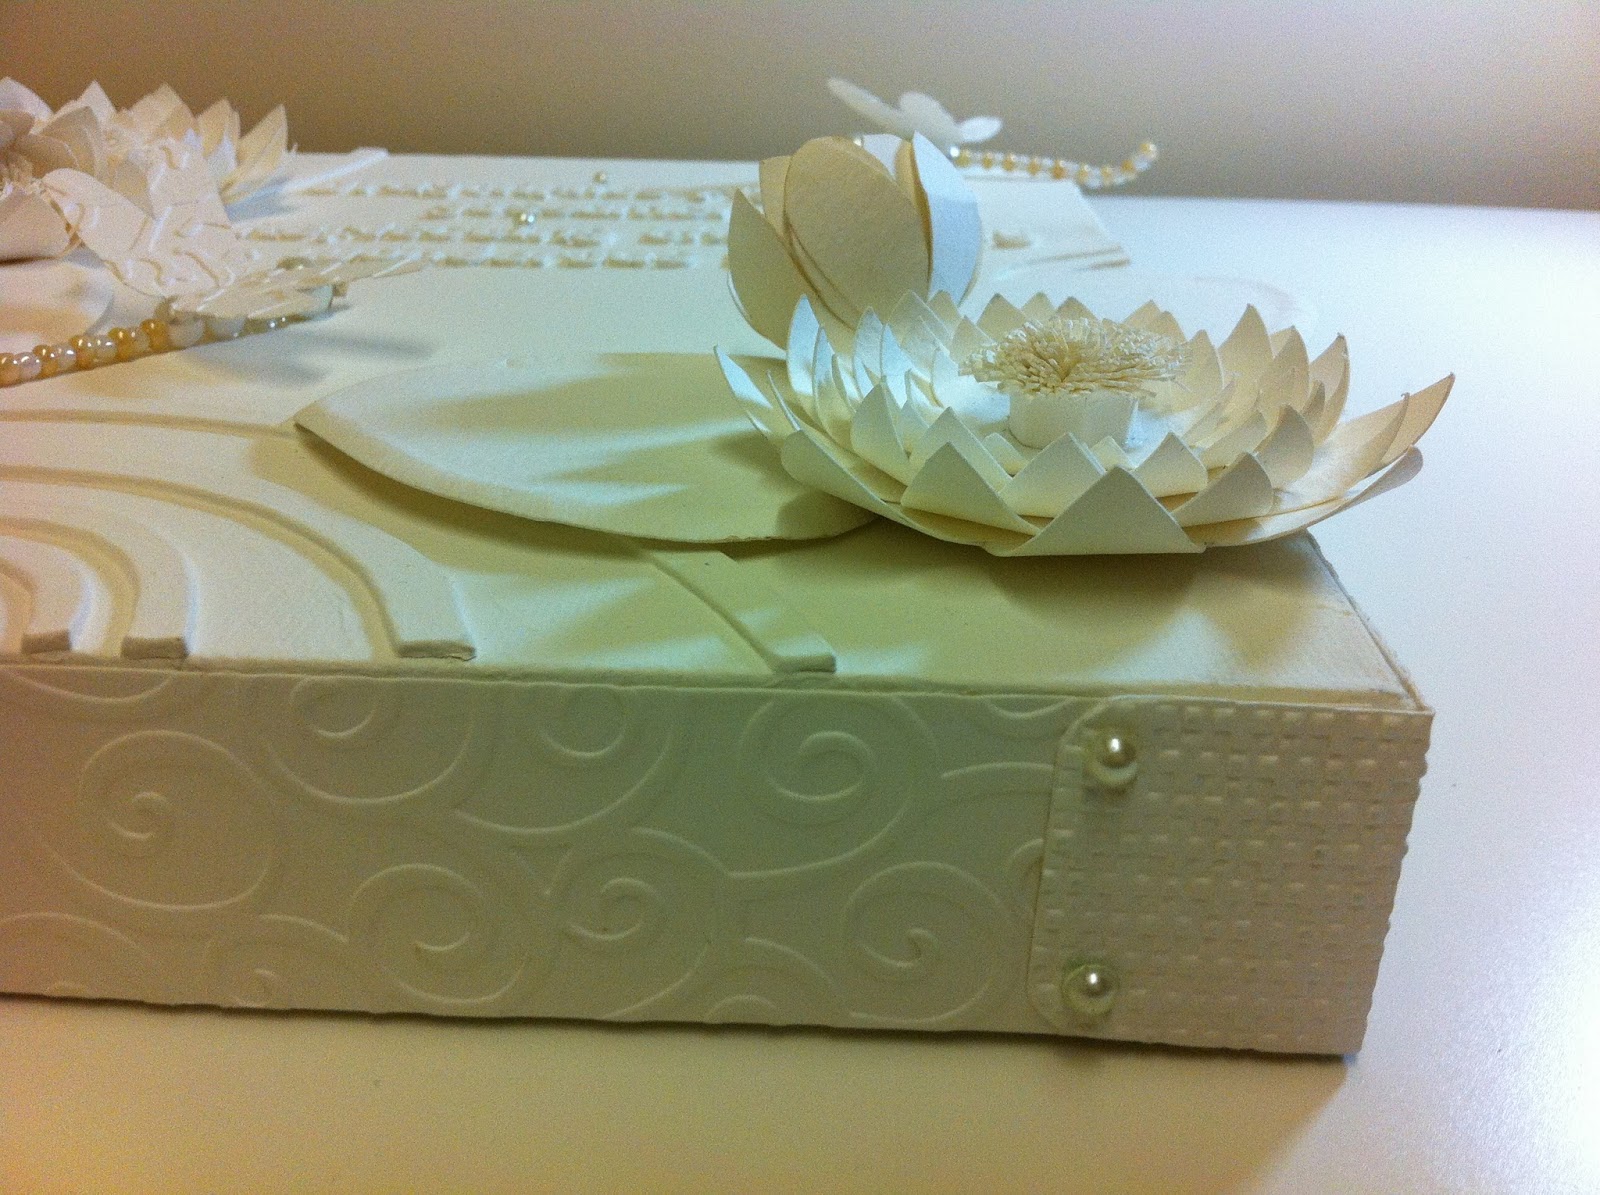
The first 'S' word that inspired me this week was Shadows and as I have made a canvas entirely out of cream card stock and cram paint it is the Shadows that play an important role in how the finished piece looks.    It made me think of all the elements we all include in our work that add texture and layers and even if we are not fully aware of it it is the shadows that we create that add the interest and drama to our creations.  Working entirely in one colour lets you see all the shadows and I think they definitely add the drama to my Water Lilly Pond.

The other 'S' word was Scissors and they were the most used tool as I put together my canvas I used them to cut out my Waterlilies and Leaves and believe it or not all the lettering.  I would rather not have had to cut out the letters but I did not have a chipboard alphabet small enough to use so I hand cut all the letters for my verse.  It took me quite a while as you can imagine and there were a few points when I thought.....'What am I doing?!'  But I got there and I am quite pleased that as they are hand cut they have the same charm as using your own handwriting does on a layout........However, I will be keeping my eye open for a very small chipboard alphabet all the same ;-)


As you can see my Scissors certainly got a work out.  Each of the Water Lilies have 7 Layers and a finely fringed centre.....and as I mentioned before those hand-cut letters.


Look at all that fringing.  It takes a while but I really love the fluffy finish it gives to the Lily centre.


I wrapped my box canvas with embossed strips and corners (more shadows!) and added a few creamy pearls to look like brads.


I also used pearls to make the bodies of the Dancing Dragonflies.

Dragonflies flying on gossamer wings.
Reflecting the beauty of wonderous things.
                                                                            Helen Allen

So with 6 hours and 22 minutes to spare I am pressing the post button and am off to link with the Simon Says Stamp and Show challenge.  I wonder what challenge tomorrow will bring!

Thank you for popping by X


Saturday, 27 April 2013

Homage to My Distress Inks

Hope everyone is having a fun weekend.  For the past couple of days I have been working on a project inspired by the challenge over on the Simon Says Stamp and Show Challenge Blog.  The theme this week is colour and I was worried for a while there I was going to miss the posting deadline!

Colour made me immediately think of my Distress Inks as they are my go to item when I want to add colour to a project.  I can paint with them, stamp with them, make inky gorgeous backgrounds with them,  dye ribbon with them and do this with them!


I had a wonderful inky time putting this together.  As you can see I was quite a while making all these teen tiny paper bows.  I learnt how to make them last week and now I think I am a bit bowed out!!


I loved the dimension of this piece and I think that the liberal use of cream highlights the Distress ink colour pallet.  It makes a great reference point when I want to create Distress Ink colour combinations too.


If you want to try something like this I made a video of how I put it together.  I like making these videos as it shows the design process and how fluid it is.  You may start out with a firm idea in your head but the practicalities of creating that vision may take you in a completely different direction.


There is also a video on my You Tube Channel to show you how to make the origami paper bows.  I would suggest starting with a larger bow first though!!


This project reminded me of another piece I made inspired by my treasured Distress Inks.  Another celebration of the gorgeous rainbow of colour at your fingertips.  This piece has hung in my open plan Kitchen Diner next to the Conservatory window and there is no hint of any fade at all......Might be a bit of dust though!


A big thank you to everyone over at Simon Says Stamp and Show for the inspiration.  I do love a challenge.  Be sure to pop over and check out all the colour inspired pieces.

Wishing you all a colourful weekend.....I am hoping for sun to get out in the garden as it needs a bit of a tidy before nature gets to spreading its beautiful colours all around.

Thank you for popping by X

Wednesday, 20 March 2013

Tim Holtz Tattered Floral Challenge

Take one well loved and used Tattered Florals die.........


And a bit of die cutting, inking, light distressing and layering later!


I just had to join in this wonderful challenge.  It is testament to why the Tattered Florals die is such a hit with us all.  So many beautiful ways to use it.  So many gorgeous flowers to be fashioned.  Hope you like my Chrysanthemum made from many layers of the daisy die (tutorial coming soon to a blog near you!).  It is a labour of love but I think it is worth it.  I used Shabby Shutters Distress Ink, Tattered Leaves and Vintage Lace dies, some Cream card stock and a sheet of Graphic 45 Little Darlings paper to turn my Chrysanths in to a pretty card and a cute trinket box.  I have one Chrysanthemum left and I was wondering if I could spray it with some form of varnish to make it more durable and perhaps turn it into a broach or corsage style bracelet.....watch this space!

If you want to see more fabulous ways to use the Tattered Florals Die follow this link to the Tim Holtz Tattered Floral Challenge.

Saturday, 2 February 2013

For My Little Star!

I wanted to take part in a challenge this week and I spotted the Simon Says Stamp and Show when I was reading at a great blog that I follow The Artful Maven Haven and Anita mentioned the challenge as she is now part of the Simon Says Stamp design team (I am not surprised as she is a very talented lady) so I followed her link to see what it was all about.

The theme this week is Seeing Stars and here is what I made.


It was really difficult to take a photo of the stars in my Challenge piece!  But I think you can see them here (put your glasses on and get closer to the screen!!) but the biggest star in this piece is who I made it for.  My youngest son turns 14 this month and this is his card come keepsake.  I know he is not going to see it as he is too busy chatting to his pals on his phone to think about checking out Mum's Blog!!!


As you can see, and those that know my work will not be surprised, I got a little carried away with the construction again!!  I really loved making this and it did come together relatively quickly ....that means not to many technical  design hiccups.  I loved being able to use my Graphic 45 papers for this as they have so many great mix and match designs and these ones were perfect for a boy....sorry young man!!


The first pyramid opens up exploding box style to reveal a smaller pyramid inside.  Callum plays guitar so these stamps are perfect.


 Which in turn opens up to reveal a birthday surprise!!!


Confession Time!! I didn't plan for the small pyramid to stay partially up like this but because I used the bottle tops to decorate they propped the sides up a bit and it was a happy accident as it looks rather good....if I say so myself...and at this time in the morning I am definitely the only one awake to say it in my house ;-)


Another view of the centrepiece.  I think I have managed to get all the bits of hot glue strings off it!


The faux drawer at the bottom pulls out to reveal it is actually a hidden mini.


Last photo.....and now I am off to link this to the Simon Says Stamp Challenge before I hide it somewhere safe until the 12th and then to go to bed.  Night all and thank you for popping by.

Tuesday, 23 October 2012

Halloween Mummy Wreath - Video Tutorial

I have been having a spooktacular time this weekend!!!!  I have long wanted to make some Halloween Door Decor and this year I may actually get around to it.  It was the perfect excuse to share what I did with you on a You Tube video too.  I recently learned how to do voiceovers which helps edit out all the ummmmms and pauses for thinking that seem to happen when I try to talk as I make on video!!!

So first up - my inspiration - I love looking at all those pictures of homes with owners that seem to be able to get their act together, whatever the season, and dress up their doorways to welcome visitors.  I just about manage it a Christmas and in past years I have been adding to my collection of Halloween decor.  I was flicking through a scrap book of mine and came across this layout and I knew what I wanted to make.


I created the Mummy flap on my layout to bring a fun element to my layout.  My little spook is not so little anymore!  He is thirteen now and taller than me.  I wanted to make a Mummy wreath and here she is in all her ghoulish loveliness!  I had a great time coming up with this as you can imagine.  I can't wait for the Trick or Treat visitors to start arriving!


If you fancy having a go at this I have put together an edited highlights video of its construction.  Please please let me see if you decide make her (or it could be a him if you take off the bow, spider lashes and glitter lippy!)


I will be slowly adding to my newly created You Tube Channel so if you want to be sure not to miss anything then please follow the link and subscribe.

I have decided to enter this glamorous lady into a beauty contest (challenge) over at the Inspiration Emporium.  Spider lashes, Stickles lippy and faint odour of eau d'crypt and all!

Happy Halloween x

Monday, 16 July 2012

12 Tags of 2012 - July

I'm feeling a bit light headed after creating this months tag as I couldn't quite get the splatter right for what I had in mind.  I have not got a tin of air to hand so I took apart a pen (a Disney Cruise pen!) and blew really hard!  Hence the slightly floaty feeling!  It was fun though and I liked the end result.

So here is my July tag for the Tim Holtz 12 Tags of 2012 Challenge.


I wanted to create a background with Tim's alcohol ink blowing technique that I could stamp my fairy on to.  I used Cranberry and Sunshine Yellow to make a sun burst and then added some Meadow puffs at the bottom of the tag for my mushroom to sit on.  I had a little trouble getting my Fairy Stamp to dry and I have a feeling it was either the gloss coating on the card I used or the mixing of the alcohol ink and the Versa Fine that may have caused it.  I did get a couple of smudges but using the foliage and magical stars stamps soon sorted that out.

Then after a blast with the heat gun to try to avoid any more mishaps I had fun with some Creative Expressions drawing inks colouring my fairy and adding magical splatters.  (Well I hope it looks magical anyway!)

I attached my newly acquired metal word band and filled a teeny tiny jar with Fairy Dust to finish off my interpretation of the July Tag.

I had great fun with this and am looking forward to seeing what everyone else has come up with.  Follow this link if you want to see more July tags.

Thanks for popping by to visit.  I am off to put my Disney Pen back together so as they say in Disney 'Have a Magical Day!'

Sunday, 20 May 2012

Tag Tuesday - May 15

Hello to any lovers of tag art popping in to visit.

I found a fab challenge at Tag Tuesday where each week you can make a tag according to the theme for that week.  If you love a challenge and love making tags this is a great place to visit so follow the link ........ after you have had a peek at my effort of course!!

It is a popular challenge so I am an 'also playing along member' at the moment!!  So long as I can play too that's fine by me....  This weeks theme is gardening and I picked Land Girls as the inspiration for my tag as you can see.

I couldn't decide what image I wanted to use on my tag so I picked one and then used the others to make little cards that I popped into a pocket.  I used acrylic paint to transfer my image to my tag which is always a great way to get an aged look going on.  I decoupaged my Land Girl and even fussy cut around the prongs of her pitch fork without cutting them off!

I used glossy accents on the Womens' Land Army badge to use it as a cool little embellishment on my tag pocket.  Then looking for more charm or embellishments to adorn my tag I decided to make paper veg!  I have written a quick tutorial as I had fun making my carrots and cauliflowers and wanted to share - I wonder if this counts as two of my 'five a day"? :-)


So thank you for popping in to visit and thanks to Carolyn and Tag Tuesday for the Challenge.  It was interesting to read about the efforts of women during the war years.  It must have been a wonderful feeling to know you were supporting the men of the country off fighting the war.  Have a look at some of the great images of the Womens' Land Army out there on the internet - farmers never looked so glamorous!!

Monday, 14 May 2012

12 Tags of 2012 - May

Tim has posted his May tag and I couldn't resist making my version even though I am busy with class preparations and working on my website.  I shouldn't have but it was too too tempting to have a go at making porcelain flowers!  Fab techniques this month but as usual I had to adapt things to suit what I had and what I did not.  That is the beauty of Tim's challenge to create a tag inspired by his design and the techniques he uses to make them.


I didn't have the stamps that Tim used so I came up with an alternative that I was really pleased with.   I started out by using mat medium to adhere my pattern tissue to an A4 card wrinkling the tissue slightly as Tim did.  Once it was dry I printed my sewing images onto the A4 card.  It took me a while to work out where I needed things to be  but I was pleased with the end result.  I think I will use this technique again.  I cut out my tag from the A4 card and I distressed and inked my edges using Frayed Burlap.


 I coloured some of Tim's frilly lavish trimming with Sea Glass distress ink and cut it in two.  It was my last piece so I wanted to make it go further!  I also coloured my tape measure ribbon with the sea glass and then attached all my ribbons, tape and ric rac to the bottom of my tag.


I wanted to use lots of sewing bits an pieces on my tag so I printed off some old cotton reel labels and some needle packaging I found on the internet.  I inked the cotton reel labels and embossed around the edges of them to give them a button shape before sticking them on my tag.  I cut out distressed and inked the edges of the Needle packet before attaching it to the left side of my tag.  I had a dungaree fastening from one of my boys in my bits and pieces box and thought it would make a nice addition to the top of the tag.


Then I had a ton of fun making porcelain flowers.  I have never done this before and I do not have a melting pot so I adapted!!  I rubbed the flowers with my perfect medium pad to get my first layer of embossing powder to stick and then kept dipping the hot flowers into the embossing powder until I had the desired effect.  It worked very well and I love the result.  I will definitely be doing this again.  I didn't have a cotton reel to sand the back off but I did have an old thread card so I wrapped that with a bit of red thread to use as my flower vase.


I dyed some american seam binding with tumbled glass distress ink and a touch of barn door distress ink too.  I tied this and another bit of ric rac to my dungaree fastener.  I did some red kiss stitches and sewed on three large eyes (hook and eye fasteners).  It was at this point that I realised I had not done any stamping on my tag so I decided to stamp a quote.  It was a bit scary as I had almost finished at this point and the last thing I needed was a dodgy stamp image!  I confess to having to go over the image in places with a black pen :-)

I coloured my coat hanger and charms with a black pro marker as they looked a bit bright and I think that it worked quite well.  Here are a couple of close ups for the details.


Friday, 27 April 2012

More Playing Cards!

As I have been learning to Blog I have been finding more and more interesting things that everyone is doing out there in Crafty Blogland.  I particularly love all the challenges I keep finding.  As anyone that knows me will confirm I love a crafting challenge!!!  It is like a creative workout - wish I relished a physical one as much.  I'd definitely be slimmer if I did :-)

I was thinking of entering a challenge I had spotted whilst pottering around in Blogland and as you know if you have popped in to visit me recently I have been working on card designs using up playing cards I had squirrelled away (for far too long to admit to!)  If you want to see the other designs follow this link and then this one!

Yesterday I started making a flower using larger playing cards.  I cut out petal shapes and threaded them on to a brad before shaping them and fanning them into a flower shape.  So here is another design using up playing cards and my entry into the April Challenge on the Truly Madly Crafty Challenges Blog which just happens to be Handmade Flowers!  Perfect.


Here is a close up of one of the flowers.  I love the way my flower centres worked out.  I had laid my design out and was trying to decide where I could put a greeting as there wasn't really much room when I thought I could put the greeting on the flower centres.  I printed out my greeting circles and cut them out before running my embossing tool around the edges of them the shape them into a cup shape.  I attached them to the flower centres and gave them a liberal coating of Glossy Accents.  


I have to do some work on my website today.  I have been putting it off as I am finding it hard to write the text.  I think I just have to do it and then update it if I need to.  Otherwise I am in danger of having a great looking website with no words at all!!  Stop stressing and start doing I think.  Wish me luck!

Thursday, 26 April 2012

More Playing Card Designs

Yesterday I made a card using mini playing cards as I had challenged myself to use up some of the things that had been languishing in one of my drawers.  You know what I mean....the 'forgotten stash'.  I really wanted to make some more along the same lines as they were fun to design with.  So I did, and here they are!


Took me a while to stick the gems on this design!  It seems playing cards are a good bet (pardon the pun) for a mans card.  Why are men more challenging to buy presents for and make cards for I wonder?  ....And they get short changed when it comes to fashion choices too!


I had another go with the Cosmic Shimmer Pearls on this one.  Definitely still learning, my pearls are freshwater I think!!  Does anyone think the cards look like they are floating in the air?  If you are inspired to try using playing cards too.  Don't forget to pop by and leave me a link as I would love to see what you have created too.  There are lots of greetings you could come up with using playing card terminology I am sure. 

The first card I started with a greeting which led to a design and the second card started with the design first and then I thought about the occasion I wanted to send the card and wishing someone good luck seemed appropriate for cards somehow.

I am off to get started on another tutorial to add to my collection (see side bar on the left).  Thank you for popping by.  If you fancy signing up to follow my blog that would be fab as I love to see who might be dropping in to visit me from time to time.

Tuesday, 3 April 2012

12 Tags of 2012 - April

When I participate in Tim's 12 Tags of 2012 I can be sure of the following things:

1.  I will learn something.
2.  I will want to go shopping.
3.  I will get creative.
4.  I will enjoy myself.
5.  I will end up with very unladylike fingers!

So thanks to Tim for all of the above.  Here is my version of Tim's April tag.


As you can see I had the bird in the cage die and I made romantic love birds for my spring tag.  I did my best with the background technique as you can see below.  I wanted to use my Mustard Seed Distress Ink as I haven't used it yet so I used it instead of the Wild Honey.  I didn't have a suitable embossing folder to make a frame so I stamped my script and then tried to make my own embossing plate with a Kay and Co chipboard frame.  First time through the mangle and it was too thick and it ripped the card.  Then I had that 'What a silly thing to do" feeling when I realised I had well and truly stuck the frame to my Cuttlebug plate!  I tried to peel it off and the chipboard split into layers and then I had a 'Eureka' moment.....I tried embossing again and the peeled thinner frame worked much better.  


It took me ages to get the residue of the frame off my cutting plate and then I realised I should have used it a couple of times before I ripped off my unique embossing frame!  I think that was my dumb moment....
My embossed frame stood out more as I blended the Distress Inks over it and even more when I tapped the tag into the spritzed water.  So EVENTUALLY I was quite pleased with the effect!


I wanted blossom on my spring tree branches so I took some mini paper roses I had in my stash and took the centres out of them.  I rubbed them with some Mustard Seed Distress Ink and then spritzed them with water which spread the colour nicely.

So thanks again to Tim for the fun and the messy inkiness of it all!  I probably should have washed my hands before I typed this.........


Related Posts Plugin for WordPress, Blogger...