This blog is a record of my creative journey. I love to share my passion for paper crafting so I design projects and then create tutorials and workshops to show you how to make them. Please feel free to wander around to check out all the things I share both here, in my ETSY shop and over on my You Tube channel. Thank you for popping by!
Here is a sparkly little Shaker Card Tutorial for you. This one features papers from the Graphic 45 Voyage Beneath the Sea paper collection but you could make this with different themed papers too.
The Journalling cards that come in this collection were the perfect choice for the fish tank background and the sentiment inside the card too.
I really hope you find this tutorial inspiring enough to give it a go yourself. Don't forget to let me know how you get on.
If you need any more inspiration for using up some more of the Beneath the Sea Paper collection you will find more Graphic 45 inspiration on this play list. Click here to see more.
Hi Everyone from a cold and rainy England today....well it is here where I am and it is perfect crafting weather! Every Cloud..........has a crafting lining LOL!
Before I get on with editing another video here is a little card making inspiration for you. This works for lovers of Graphic 45 like me who may have Precious Memories papers in their stash or who have similar patterned papers they can adapt. Equally you may have other papers from other collections that would also suit making a card like this one.
Here is the tutorial to show you how.
Whilst you are there you might want to have a look at other ways of using Graphic 45 Precious Memories papers like these which all have tutorials of their own.
Happy crafting everyone and thank you for popping by X
Today I am sharing a tutorial that shows you different ways of using alcohol inks to create backgrounds for your stamping. This quick and easy card features the Something Fishy stamp set from Rubber Dance.
I will guide you through the techniques and pretty soon you will have a card like mine that looks fab inside and out…..if I may say so myself ;-)
So if you want to have the chance of winning these stamps all you have to do is pop over to my channel on YouTube, subscribe if you don't already and then leave me a comment to say you want to join in. If you want to go into the draw twice then just share the tutorial and make sure to tell me in your comment that you have done so. The Giveaway runs from 22 July - 05 August 2016.
This tutorial is all about how easy it is to create interesting mixed media background papers that you can then go on to use in your projects. I show you how and then how to turn that into a pretty flower card.
I have used my paper as a background paper and then I have revealed the design by cutting a stencil design into the white card. I finished off with some punched flowers and voila!!
I really hope you enjoy the tutorial and have lots of fun creating your background papers in a myriad of colours!
The weather has finally turned a little warmer here so I am off out to have tea in the garden - a fabulous end to the weekend. Hope you have all had a wonderful time too.
Thank you for popping by X
PS A Stamp Giveaway coming very soon so watch this space!!!!
Well it is a bit grey and damp here at the moment so I hope it is sunnier where you are today. Just a quick post with another little tutorial. Sorry about the photos but as I said this was footage from a few years ago!
I used similar papers for both of my designs but even so I think because I used two different sets of flower stamps the photo above has an oriental feel whilst the one below is a little more modern looking.
This is a really easy card idea to replicate and I know you can come up with all sorts of paper combinations using your own flower stamp stash…..!!!!
Hope you have fun with this tutorial. Thank you for popping by X
Over the coming weeks I will be bringing you tutorials I videoed some time ago. Because video files are so large from time to time I have to move them on to an external hard drive and these are the ones I have forgotten!!! So I am dusting them off and editing them and I hope they are useful tutorials with fun ideas for you to try or adapt for your projects.
This first tutorial has a fun rag daisy embellishment that I know you are going to be able to make and use to embellish a whole host of crafting projects.
This card can be made in any colour combination - Navy and white - Cream and Pink…it is up to you all you need is card stock and a matching ink - combine that with a flower background stamp, a fun greeting or two, a butterfly stamp and some die cut foliage, etc. These are all things you will have in your stash I am sure.
Add a strip of fabric and a needle and thread and you too will soon have a lovely summery card like this one. Next to these card photos I found a photo of this little (not so little) beauty. I wonder if the cake inspired the card or the card inspired the cake?
Either way I enjoyed making them both!……..and eating the cake of course ;-)
YUM! Now I am hungry. But off to check out my archives again so I can bring you another tutorial very soon…..but for today here is the tutorial.
Hope you are having sunny weather or are making sunny projects….or both would be perfect. Until next time, thank you for popping by X
As well as lots of UFOs on my desk (UnFinished Objects) I also have amassed some on my computer. Videos I have filmed but have yet to edit. It seems about time I set to and got some of them posted.
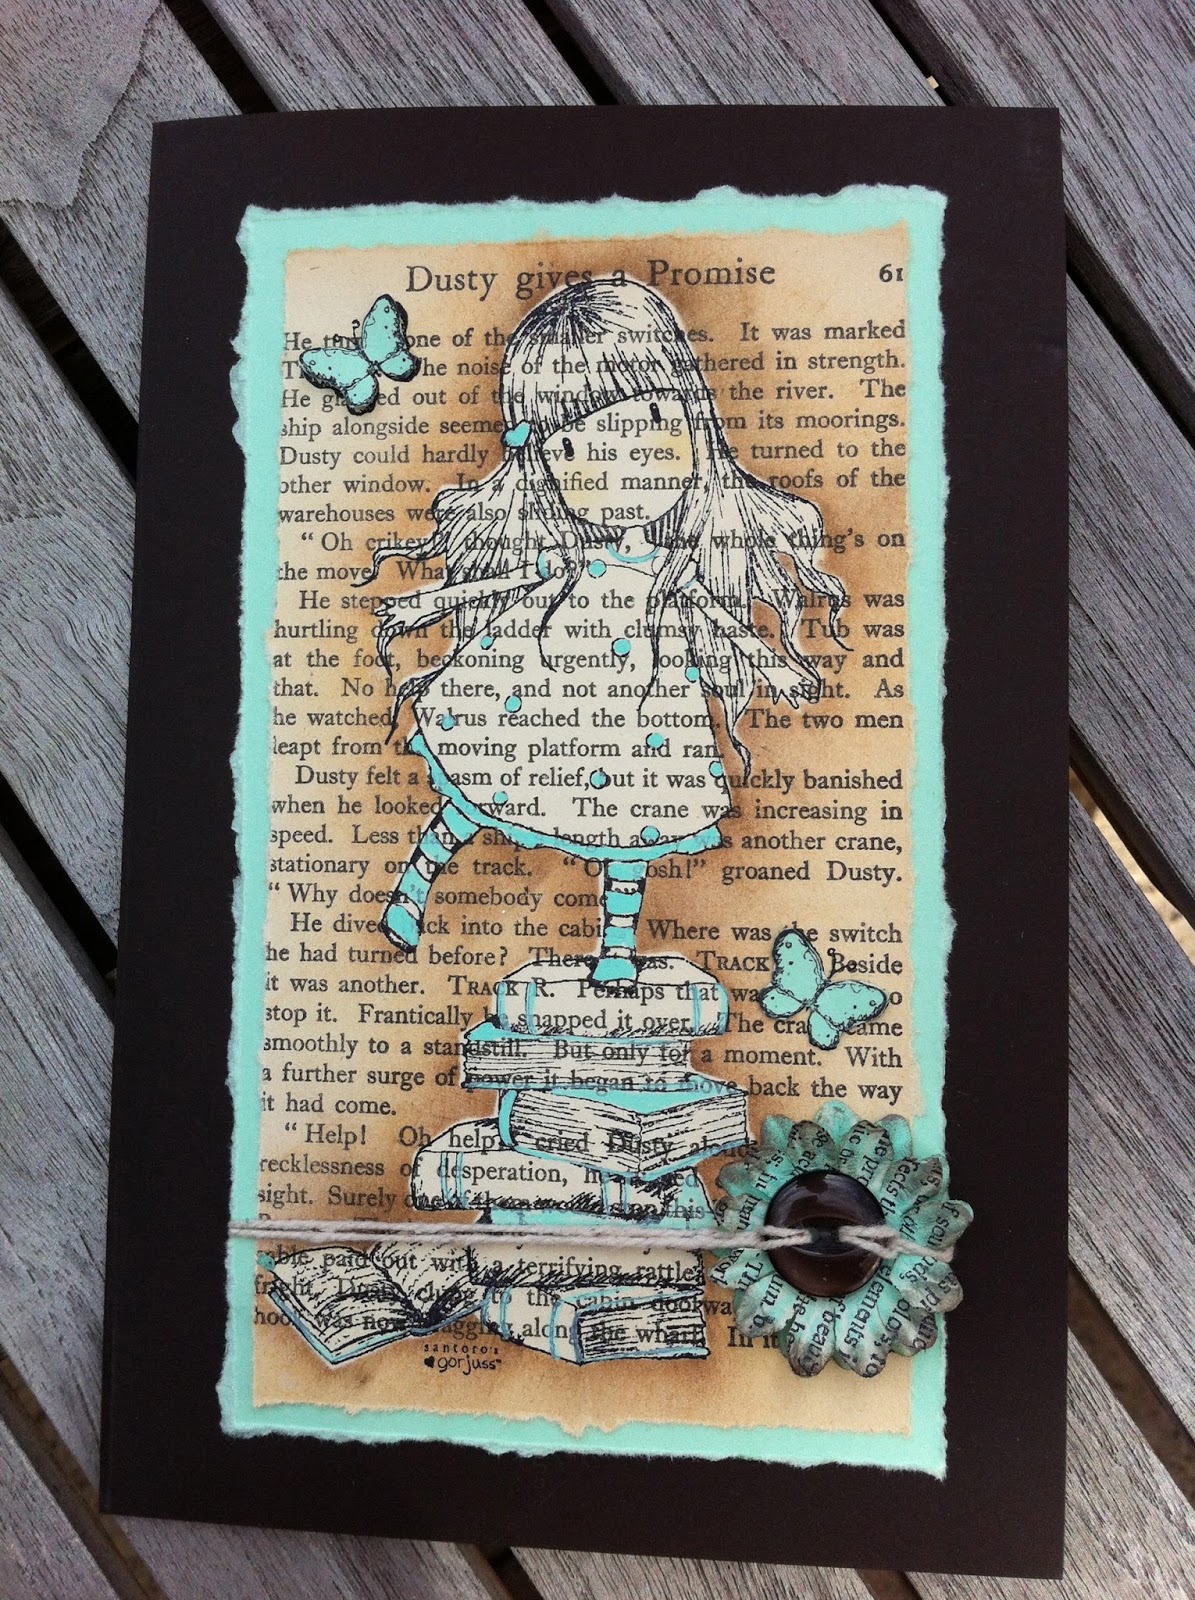
Here is the first one! I loved this technique and I know that it has a lot more ways in which I could used it but for now I wanted to share this tutorial for a lovely way to highlight your stamped images when you print them on to book pages.
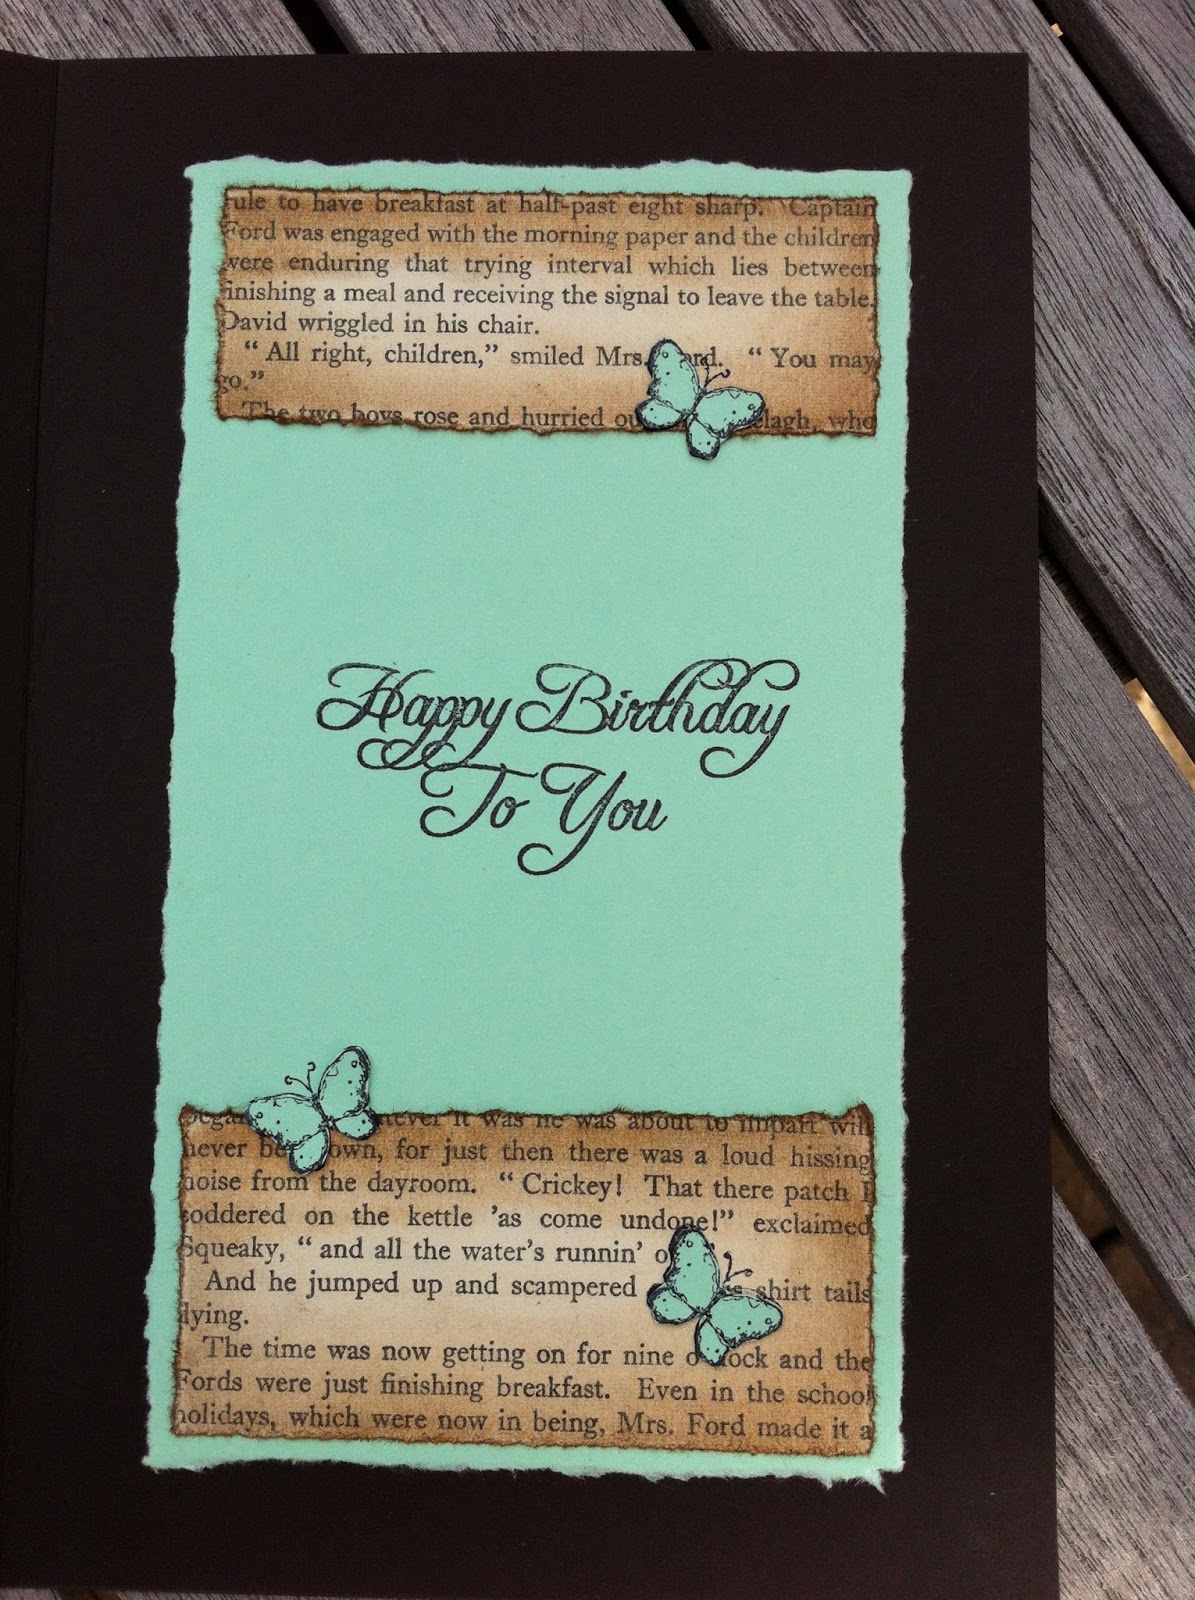
In the tutorial I show you exactly how it is done and you can use this technique with any of the stamps you have in your collection. Don't forget to make the inside of the card look as fabulous as the front!
Cutting Guide:
Brown Card Base - 8" x 10 1/2" scored at 5 1/4"
Book Page Front - 3 1/2" x 6 1/4"
2 x Green Cards - 4" x 6 3/4"
Book Page Strip Top - 3 1/2" x 1 1/4"
Book Page Strip Bottom - 3 1/2" x 1 1/2"
I just realised I forgot to let you know that I had some very good news recently! Sometimes my social media outlets get the better of me LOL! I have been selected to be part of the Guest Design Team for the Fall/Winter season for Faber-Castell Design Memory Craft ®. I am super excited and can't wait to share my first project with you over on their blog on the 24th November. I will give you a sneak peek here to remind you to pop over on the day! Thank you to everyone for their kind comments over on my Facebook page. It is so lovely to have your support and I really do appreciate it.
Here is the tutorial I promised to deliver!!! Hope you like it.
See you again soon - off to find another UFO!!! Thank you for popping by X
Hope you are enjoying the sunshine wherever you are in the Crafting World today! I am just posting this before I pop out into the garden to finish off jet washing the patio. I end up looking like the mud monster when I have finished!
Today's tutorial is for a pretty gatefold card using the Rubber Dance Antique Botanicals stamp set. I love how they look against the book page background papers I decided to use. As usual the inside matches the outside which is particularly important in a gatefold card as you can see the inside of the card when it is displayed.
The Happy Birthday die cut is from Tattered Lace. It is a recent purchase and I thought I had lost it! I spent an age rifling through the debris on my desk and in my bins only to realise the die was safely stored on the magnetic sheets on the back of my craft room door where it is supposed to be!! ;-) I know you know the feeling right???
The card dimensions for this card:
Burgundy Card Base - 11 1/2" x 5 3/4" scored and folded on the left and right sides at 2 7/8" to form a gatefold card.
Cream Card Inner - 5 1/2" square
Book page strips Inner - 5 1/2" x 3/4" (Cut 2)
Book page panels Front - 5 1/2" x 2 5/8" (Cut 2)
Here is the finished card. I have used water colour pencils to lightly add colour to my flowers using a slightly heavier hand for the decoupaged flower in the centre.
Thought I would share another tutorial today that matches the sunny weather we are having here today! Mind you it is very chilly out there despite the sun - I believe our weather system is drawing down cold polar air…..someone needs to tell Mother Nature we are expecting spring weather round about now ;-)
So for those of you newly popping by I am in the process of waiting to see if I make it on to the Graphic 45 Design team…..I am convinced about now that someone is slowing down time so I am going to fill it with crafting and gardening this week to see if I can't speed it up a little.
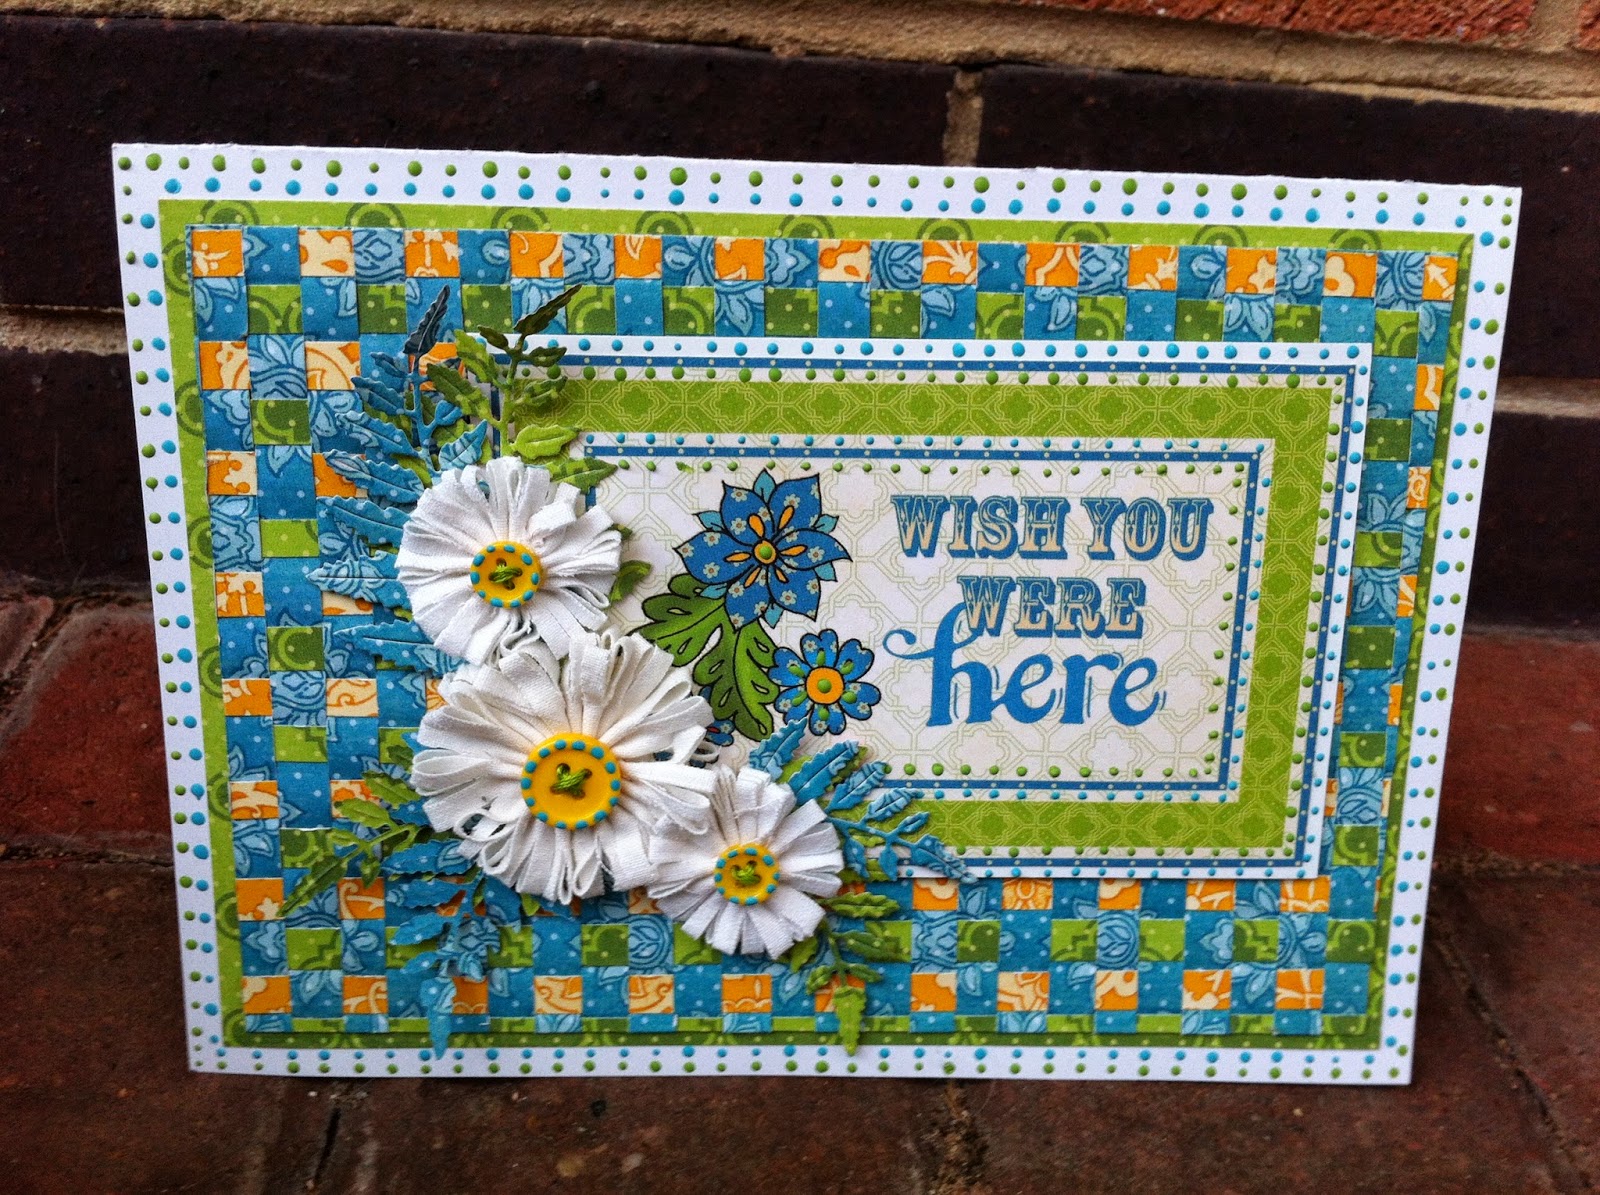
For my round one submission I made several new projects and as usual they were all videoed to turn into tutorials to share with you all. I thought I would share this fun, bright and breezy card today that was inspired by the sunny patterns of the Graphic 45 Bohemian Bazaar paper collection.
In the tutorial I show you how I created the pretty paper woven background for this card as well as how to make a quick topper with the fabulous journalling cards that come in the Graphic 45 Paper collections. This is just one of their many uses.
As usual I had fun making the inner as fabulous as the outer using some Tattered Lace dies which I borrowed from my Mum! Thanks Mum x
I also show you how to make some gorgeous fabric daisy embellishments which work perfectly with my bright and breezy papers.
I know this card will make anyone smile when they receive it on their special day. If you don't have Bohemian Bazaar papers in your Graphic 45 Collection I know that you can make this card in any of the paper collections you have treated yourself too. You might need to change your accent card and perhaps make the flowers in a different colour but I know that this will look great whatever you choose to use.
Cutting Guide Using Graphic 45 Bohemian Bazaar papers:
White Card: 11 1/2" x 8" scored and folded at 5 3/4" and used in the landscape position.
'Wish you were here' card topper taken from the Lap of Luxury paper
White card mat for topper: 3 3/8" x 5 1/4"
Green Vivid Splendour: 5 1/4" x 7 1/2"
Blue Jasmine Nights for inner: 5 1/4" x 7 1/2"
White Card for inner: 3 1/4" x 7 1/4"
Woven panel in the tutorial was created originally at 5 1/4" x 7 1/2" but was later trimmed down to 7 1/4" x 5"
I suggest you work with these new measurements to avoid that step!
One piece of Blue Jasmine Nights for base of weave 7 1/4" x 5" see tutorial for guide to cutting.
The woven strips were cut from the Green Vivid Splendour and Yellow Bohemian Bazaar papers.
The strips measure 7 1/4" x 1/4" cut approximately 8 of each colour.
The Daisies:
Cotton fabric strips for small daisies: 1" x 4" (cut 2)
Cotton fabric strip for large daisy: 1 1/2" x 6" (cut 1)
I hope you find all the techniques in the tutorial I am sharing today useful and that you are inspired to get out your Graphic 45 papers and to get weaving - these panels would look great on cards or scrapbooking pages and I am sure on lots of your paper crafting projects too!
I'm off out to walk the dog in the sunshine now but I think I am still keeping my coat on……'Cast not a Clout 'till May is out,' as my Grandma used to say! Brrrrrr See you again soon and thank you again for all your good wishes and messages of support. Sending you all big hugs - Thank you for popping by X
All the names have been written and put into a little box - excuse the rubbish handwriting!!!!
……..but wait for it. …….Thought I might add a little suspense and share a little Rubber Dance Stamp love at the same time!!!! Sooooo naughty ;-)
I just had a flick through all the cards and things I have made during my time on the Rubber Dance Design Team and am posting a couple of links to past videos that you may have missed if you are new to my blog or the Rubber Dance Blog:
This is the first card I ever made for Rubber Dance and it reminds me I must get those Beach Sentiments stamps out again as I love love love that shell stamp!
Waiting for the summer sun then why not get hot and spicy with the fun Hot, Hot, Hot, Stamp set?
……..and now for the big announcement……..the first out of the box and the winner of the Something Wonderful stamp set is Denise Bryant………The Second and third out of the box and winners of the Diamonds background stamp are Gerrina and Dagmar!
A great big thank you to everyone that joined in and subscribed on our various social media links. It is much appreciated and of course a great big CONGRATULATIONS to our three winners!
If you are a lucky winner then all you need to do is email me your address - my email link is on the right hand sidebar of my blog and I will pop your prize in the post right away.
Two tutorials for the price of one today. I really hope that you all have a love-ly day today and that this Valentine's Day is filled with romance!!!!
First off I have a sneak peek of a project tutorial I am sharing over on the Rubber Dance blog in honour of the occasion. This is a romantic home decor idea and features the brand new I Hear Art stamps!
But more of that later! You may be joining me from my You Tube channel and I promised to give you all the links you need to take part in the giveaway! But more of that later too!
Firstly if you are here checking out my blog and do not know what I am talking about then listen up!!!
We have Rubber Dance Stamps to give away. There is one set of sentiment stamps - Something Wonderful and two background stamps called diamonds. To be in with a chance to win you just have to follow this link over to my post on the Rubber Dance blog telling you all about the Valentine Project in the photograph above including a video tutorial and while you are there please leave a comment to say you are joining in the giveaway. That is the only compulsory thing you need to do to get your name into the hat for the draw which will take place on the 14th March 2015. So lots of time for you to find out about this giveaway and join in the fun!
If you want to increase your chances of winning there are 5 other ways to get your name into the hat. If you subscribe to my blog, You Tube Channel and Facebook page that will give you 3 extra chances and if you also subscribe to the Rubber Dance Blog and Facebook page that will be 2 more chances to win! So potentially you could have your name in the hat 6 times in total. If you choose to subscribe and keep up-to-date with all the creativity I share on my social media and that Rubber Dance share on theirs then please sign up - don't forget this bit is entirely optional! Here are the links:
You are here on my blog so you can subscribe using any of the methods on the Right hand sidebar.
Today I am sharing my Valentine's project - a little late I hear you cry!…….But this idea is one you can use anytime of the year. It is always the right time to let someone know you care ;-)
This was a fun card to make and a little cheeky! I used stamps from the Hot Hot Hot stamp set with the addition of the hottest stamp from the Cool Winter Wonderland stamp set! Check out all those kisses! That is one hot chilli pepper!
Here is the inside - lots of room to write romantic messages to your loved one! The I love you ribbon can be omitted if you are not at that stage yet ha ha!
In the tutorial I show you how to make the card and you will see how to make your chilli pepper jiggle and wiggle! Even if you don't want to make this card the wiggle element is a useful thing to know how to make for other cards you may wish to add a little movement to.
Today I am spending the day at a Prima workshop with Finnabair. I am so excited about attending and trying out some of her techniques! I will take photos so watch this space!
I hope you enjoy all the romance and crafting I am sharing today and once again I wish you all a Happy Valentines day and good luck for the giveaway!
It is time to tempt you to play along with us over at Rubber Dance for this months colour challenge. The colours are Teal, Maroon/Burgundy and Brown. As you can see from my card below I added a little cream into the mix!
This was an unusual colour scheme for me so it was fun to try to work with it. That is the beauty of playing along with our challenge. Each month a new set of colours and an optional theme to get you thinking. This months theme if you choose to use it is LOVE!
Just had to make a Valentine but with a little twist. In the video tutorial I will show you how I made this little 'twist' on an easel card. I wanted something arty to reflect the new stamps I worked with! Look what the postman dropped off just in the nick of time!
How happy am I???!!!….Just noticed the Antique Botanicals set is upside down….Ooops. Check out the video as you will see the gorgeous details in the latest fabulous stamps from Rubber Dance. These are just 3 of the sets that are launched this month.
So enough of the chit chat, what did I actually make to tempt you to play along with us this month over at Rubber Dance?….
In the video I show you how to make the unusual shaped easel card. There are a couple of ideas of how to make the most of your stamps by looking at other things you could use them for and of course I show you how you too could make an Arty Hearty Valentine for the one you LOVE this Valentine's Day!
When I was looking for an embellishment to put on my card I found a little bit of a broken Abalone heart bracelet that has been in my drawer awaiting the perfect project. Add a little knot of delicate tule and I think I will be using this idea again!!
I am tempted to try this design again in Red, Black and Cream with a touch of Pink……But since this is the second Valentine I have made this year!!!!!! I am already ahead for next year ;-)
I hope you are all managing to stay afloat during this busy run up to Christmas! I started out with good intentions, as you know, to have all my cards made and ready to send out of the door on December 1st!……..and here I am on the 16th posting my last video in this mini series and I am off to post the last two of my cards as soon as I have written this ;-)
I really hope you like this one as I loved how it turned out. It is definitely the longest of the card batch making sessions but I hope you will agree it is worth it. May I present to you the window shaker card using Rubber Dance Stamps!
Lots of frosty goodness in the window shaker and fabulously festive foliage to decorate the card. I hope that even though this series took a little longer than I intended you agree this one was worth the wait! If you have friends and family visiting at Christmas this is the perfect card for them. Put aside an afternoon and you will have a batch made in no time.
I am going to do a separate page for all the card dimensions of this series which means I will have to watch the videos as I have sent all my cards out!!!!! I think a little fast forwarding will be in order ;-)
So without further ado here is the tutorial to show you how you can make this window shaker design.
I am not sure how many more videos or blog posts I will fit in between now and New Year as I really must relinquish my computer to the mender men before my Apple Care runs out! I am going to be bereft but I hope to give my craft room a thorough sorting and dusting and wiping down while it is away. Maybe I should promise to do a craft room tour video to give me more incentive ha ha!
At the weekend I hit 4000 subscribers on my You Tube channel and was as pleased as punch! Thank you all so much for supporting me and cheering me on. I love sharing both here on my Blog and over there on my You Tube Channel and of course selling my workshops over on my ETSY shop.
I hope all your Christmas preparations are progressing nicely and that you are a little better organised than me!!! I have an Art Journal Video uploading as I type this so I should be posting that tomorrow and I have 3 crafting things I would like to get done before the New Year ………keep your fingers crossed for me.
Incase I don't manage to do all that before my Computer is wrestled from my grasp I would like to wish you all a Very Merry Christmas (with lots of crafting goodies from Santa!) and a Healthy and Happy New Year.
I am so late with this series ….which considering that it was the exact opposite of why I decided to make this little series of what I hoped were keep me organised with my card making this year designs!!!!……oh well back to the drawing board!
Actually this card is perfect for those of you who like me are finding it hard to get everything done at this time of year. This is a quick and easy card design to put together and it looks fab….if I do say so myself :-) !
In fact it was so quick I made tags too! So if you don't have the same die as me then you could use something similar - die cutting machines would do the trick too and punches! Failing that you could choose to stamp the snowflake with Ranger Sticky embossing powder and then add the glitter. So lots of options for this design.
I used my lovely Rubber Dance Christmas Greeting stamps for my stamping. Love that 'do not open till xmas' stamp - perfect for tags or wrapping paper. You I am sure have lots of Christmas Greeting stamps you can substitute.
Don't forget to make the inner match the outer! It was fun using up the waste from my cards to make pretty tags for my presents this year. I hope you enjoy the video and that it gives you lots of inspiration for quick and easy to put together cards - this one is quite flat so great for posting too.
Today there is frost on the ground and we will be outside putting up the Christmas lights!!!! Brrrrrr - I think I will get a hot chocolate inside before I venture out! Might tuck a hot water bottle in my coat too!
Hope you are all feeling festive whatever you are doing this weekend. Have fun and thank you for popping by X
I have to admit that these colours were a challenge for me but I couldn't wait to try out my new Hibiscus stamps (NP8-M). Look at the detail and the delicacy of these images! Yummy!
Of course no card is complete without a matching inner! I really had fun getting inky for this card and you can see how to create this look if you watch my tutorial.
I wonder what these glittered hitch fasteners could be for…….
Such a tease. I am looking every inch a glitter ball right now ;-) Leave your guesses in the comments below!
While I am here…..I was having a bit of a tidy up and thought you might like to see two cards I made a while ago.
These have both been made from scraps left over from scrapbooking kits. This one was a My Minds Eye set. I had made a couple of layouts and the scrap is just too pretty to throw away - so I had a play and ….voila!
I even made the inners match - see - no scrap too small!
So fish out all those part used kits and see what you can come up with.
Hope you are having a fun weekend - Mine is all about Christmas. I am hoping to start with the decorating so to put me in the mood I am posting this Card for some last minute ideas if you, like me are running late already!!!
I started this series in the hope I would be organised for the 1st of December and that maybe I could help a few of you with your Christmas Card making too!
I have all 5 cards videoed but finding the time to edit them has been a nightmare!
This card is all about keeping it simple! I really liked how it turned out. Elegant….I hope you agree. You could make it in lots of different colour ways and if you wanted to speed things up more you could draw the lines that the pine cone baubles hang from rather than sew them. I am making a batch in Cream and Burgundy with a touch of gold sparkle.
So without further ado here is the video link:
Time to get into the Christmas spirit - I have to wash all the windows in the conservatory next and get rid of a few spiders webs before I can put up my first tree.
We have two trees in our house these days. When we redecorated the front room a couple of years ago I wanted the tree to match so I started collecting a second set of ornaments in pastel blues, greens and silvers. I loved my old baubles that I have lovingly collected over the years so much (they are all in jewel tones) I felt bad not getting them out of their boxes so the solution was…….a second tree! It takes a while to get them both up but I do love them both. I will post a couple of photos when they are done so you can see.
If you are decorating this weekend I hope you have fun actually I hope you have fun whatever you are doing! Off to get my breakfast now….
I am busy with a new workshop project but still finding time to get some Christmas Cards made and I have another video to share with you today.
When I made my Let it Snow Art Journal page last year I commented it would make a fab Christmas Card! Ta Da……..it took me a while but here it is.
I decided to make a simple easel card for this one and you will see how to use clear embossing powder to create the lovely snowy background in the tutorial.
Cutting Guide:
Turquoise Card Base - 5 3/4" x 8"
Book Page Frame - 5 1/2" x 7 3/4
White Card Topper - 4 1/2" x 6 3/4"
Turquoise Easel Card Base - 5 3/4" x 8" scored in the landscape position at 4" and 6"
Book Page for base - 5 1/2" x 3 3/4"
Turquoise Strip - 5 3/4" x 5/8"
Today I have tasked myself with getting the written instructions ready for my new workshop - The kits are in the process of being produced so I am getting there! Watch out for the photos of the samples I make along the way! Here is the first one I made way back in the year.
Time to share another tutorial! More Christmas as you can see!….and another way to use two lovely stamp sets from Rubber Dance.
In this video tutorial I show you how to use two different techniques to achieve this look. The Green card is gold embossed and the red card is gilded so the choice of colour and technique are yours!
I love how this looks - almost oriental. I had an idea for the tabbed layout and it worked really well so I will definitely be trying this on other occasions.
Cutting Guide (from the bottom to the top!):
Card Base Red/Green: 11 1/2" x 8"
1st Gold Layer: 5 1/2" x 7 3/4"
1st Red/Green Layer: 5 1/4" x 7 1/2"
2nd Gold Layer: 4 1/4" x 5" scored at 1/2"
2nd Red/Green Layer: 4" x 4 7/8" scored at 1/2"
3rd Gold Layer 4" x 2 1/2" scored at 1/2"
3rd Red/Green Layer: 3 7/8" x 2 1/4" scored at 1/2"
Gold Inner 4" x 2 3/4"
Red/Green Inner: 3 3/4" x 2 1/2"