This blog is a record of my creative journey. I love to share my passion for paper crafting so I design projects and then create tutorials and workshops to show you how to make them. Please feel free to wander around to check out all the things I share both here, in my ETSY shop and over on my You Tube channel. Thank you for popping by!
Yippeee it is sunny here again today…..mind you when I have posted this I am off to pressure wash the patio and put out the tables and chairs which usually brings on the rain!!!!! Mind you we met a chap down by the river today and he swears that it is when he puts on his shorts that the rain starts to fall ;-)
My Mixed Media Art Journal page was created so I could join in the Challenge over at Simon Says Stamp. This week it is the letter M…….reminding me of Sesame Street ;-)
So my M is for Mixed Media and of course for 'Creating it MY Way!' That is what I love most about Art Journalling…no rules……no regulations ……just time to enjoy creating.
This page makes me smile and I hope it makes you smile too. I wanted to try using stamps on my page for more than just background texture. I used lots of Distress Paint and Inks and check out that lovely boarder created in seconds with a Tim Holtz washi tape! My stamps came from the Busy Bee 3 and the Botanical stamp sets from Creative Expression. That bee is soooo cute! I think he may be American as he has fab teeth ;-)
If you are not too 'Buzzy' and you want to see how I made this page with lots of hints and tips then just click on the video below. Find out how my Inspiration words started out looking very differently!
Morning! I am up early this morning. Strange as the school summer holidays are here. Don't you just love the days when you don't have to set your alarm clock? I finished the video for my July tag yesterday. I had great fun with Tim's Patriotic inspiration as you can see!
I loved Tim Holtz's Brayer technique that he shared with us this month on 12 Tags of 2013 though I think if I had pressed a little less when gathering up the ink with my brayer I would have achieved a more streaky look than I did. I liked this alternative way to apply inky colour to a project.
Here is the video of how I got from Tim's inspiration to my interpretation!!!!
Already half way through Tim Holtz's 12 Tags of 2013 challenge - can you believe it? Where is the time going to I wonder???? I still have a January tag to play along with so I may be able to catch up with that one next month.
As you can see my tags for this year are building up nicely.
Ha Ha - I know what a teaser!!! Here is the tag storage project online workshop I am about to put on my blog/shop. It is a great solution for those with tag storage issues (if I say so myself) and I have a ton of ideas for ways to use this cute little storage project. I am working on the editing the last of the series of 5 video tutorials and finishing off the photo instructions so it will either be up on my Blog sidebar Shop and ETSY shop today or more likely because of upload times tomorrow! So if your interested in tag storage check in again soon.
I forgot to say last week but I managed to get a ticket to do a workshop with Tim in the UK at the end of August!!!! It was a marathon dialling and redialling session but I got through and I am a happy bunny! I am going with my friend Deb so we are both looking forward to getting inky.
Good morning on a cold grey day here in Derbyshire. Who is hogging all the sun again that is what I want to know!? I have my fleecy on and my fluffy socks. I have been working on my tags for Tim Holtz 12 Tags of 2013 and here is June's. I was a little 'Distressed' when I saw Tim's tag this month as I don't have any Distress Markers...........poor little old stash deprived me...... tee hee! I know you are all feeling sorry for me right now ;-) But isn't that just what makes this challenge fun. If you haven't got it then improvise and that is what makes a tag your own. I used my Ripe Persimmon and Shaded Lilac Distress paints to do my colouring in with a touch of Shabby Shutters. The colours remind me of squished berries and that is great for a tag celebrating the month of June.
If you are following me you will know I am making videos of how I get from Tim's inspiration to my interpretation so here is the video for my June tag.
I am still playing catch up with my tags so I am also posting my March tag today.....Yes contrary to the pictures it is definitely my March tag! I don't know what happened but when I labelled it up I went with May.....ooops. I have changed it now so the photos and the videos say May but it is definitely March ;-)
So my didn't have items were the lovely dies Tim used in March and that cute tinsel. I put on my thinking cap and decided that Tim's cute bunny reminded me of a shaker tag and that is where I began.
My solution to not having the paper Tim used to cover his tag was to try out a paint transfer technique with some gorgeous images from the Graphics Fairy and I decided to see if it could be done using the New Distress Paints and I am happy to say it did! I only have 4 Distress Paint colours so far but each time I use them I am impressed by their versatility so I am definitely going to add to my collection.
If you want to know how I made this tag then please watch my video as once again I start at Tim's inspiration and end up with my interpretation.........I think I like that phrase!!!
Ha ha.....I didn't realise that You Tube had selected this frame as the thumbnail of my video! Coffee and crafting.....all that is missing is the cake and cookies!
I think I might just go and put the kettle on! Thank you for popping by X
PS Don't forget to check out my giveaway for anyone that is kind enough to follow me already or who wants to join me on my crafting adventures. Just a small token of my huge appreciation of your support.
Here is my tag for the Letter R. I made a spinner tag - can you tell I have just learnt how to make these?....they feature in my card class this week too! Pass on the knowledge I say. I am going to make a video of this fun embellishment to a project. Another thing for the to do list.
There is only one R pattern on this tag and it is RAGZ but I did do two variations of it. I like the one with the little rivets on it as it looks a bit industrial. As I said before I made spinners in my tag and I tried to use the Vine app to make a small video of the spinners spinning - but alas although I managed to make the video I cannot seem to find how to get it on my blog. I know it can be done but cannot work it out at the moment....watch this space!
As I turned my tag over to put the ribbons in I realised I had made a boo boo! I stuck my tag to the wrong side of its green tag! What a numpty ;-) As I couldn't make the video I am sharing the out takes!!
Now I popping to Tag Tuesday to see what the letter R has inspired in the tag art world and then it is time to write my class tutorials....busy, busy. Thanks for popping by x
I just found the Vine Video when I uploaded some photos from my phone so I hope this is going to work!
I couldn't resist playing along after all. I kept popping in on bloggers who where having such fun creating beautiful tags inspired by Tim's 12 Tags of 2013 that I just had to!!!!
Here is my tag for May.....
Although I didn't have Tim's rub-ons to try the resist technique he shows us this month, I did have some in my stash which worked a treat (eventually, as you will see in my video!). I think the problem was one of size in relation to my tag. I got there in the end though and I really love how this technique looks and will try it again (after a bit of rub-on shopping!)
I have decided to make a how I got from A to B video for each of my tags this year. 'A' being Tim's original tag and 'B' being my version of it.
I think it should be quite interesting (I hope!). I think May's video shows how each decision you make in the design process impacts on the next decision you take. I think it illustrates what I love about this challenge and any other I have taken part in. Whatever the challenge is no two crafters will end up at exactly the same point.
So here is the link to my May video. Don't let this 12 minute video fool you this tag took me over 4 hours to make!!!.....and I enjoyed every single inky minute! Thanks Tim.
I am a couple of months behind so this month I am also posting my February catch up tag. I didn't have the stamp nor a Queen of Hearts card nor even an Ace of Hearts Card but I didn't let that stop me playing along as you can see!........
Might try this laced up detail again on something else........it looks so pretty.
If my Ace had be Hearts and not Diamonds I may never have thought to do this pop up heart!
If you like my tag and want to see how I did it I made another A to B video. Hope you find it interesting.
Hope everyone is having a fun weekend. For the past couple of days I have been working on a project inspired by the challenge over on the Simon Says Stamp and Show Challenge Blog. The theme this week is colour and I was worried for a while there I was going to miss the posting deadline!
Colour made me immediately think of my Distress Inks as they are my go to item when I want to add colour to a project. I can paint with them, stamp with them, make inky gorgeous backgrounds with them, dye ribbon with them and do this with them!
I had a wonderful inky time putting this together. As you can see I was quite a while making all these teen tiny paper bows. I learnt how to make them last week and now I think I am a bit bowed out!!
I loved the dimension of this piece and I think that the liberal use of cream highlights the Distress ink colour pallet. It makes a great reference point when I want to create Distress Ink colour combinations too.
If you want to try something like this I made a video of how I put it together. I like making these videos as it shows the design process and how fluid it is. You may start out with a firm idea in your head but the practicalities of creating that vision may take you in a completely different direction.
There is also a video on my You Tube Channel to show you how to make the origami paper bows. I would suggest starting with a larger bow first though!!
This project reminded me of another piece I made inspired by my treasured Distress Inks. Another celebration of the gorgeous rainbow of colour at your fingertips. This piece has hung in my open plan Kitchen Diner next to the Conservatory window and there is no hint of any fade at all......Might be a bit of dust though!
Wishing you all a colourful weekend.....I am hoping for sun to get out in the garden as it needs a bit of a tidy before nature gets to spreading its beautiful colours all around.
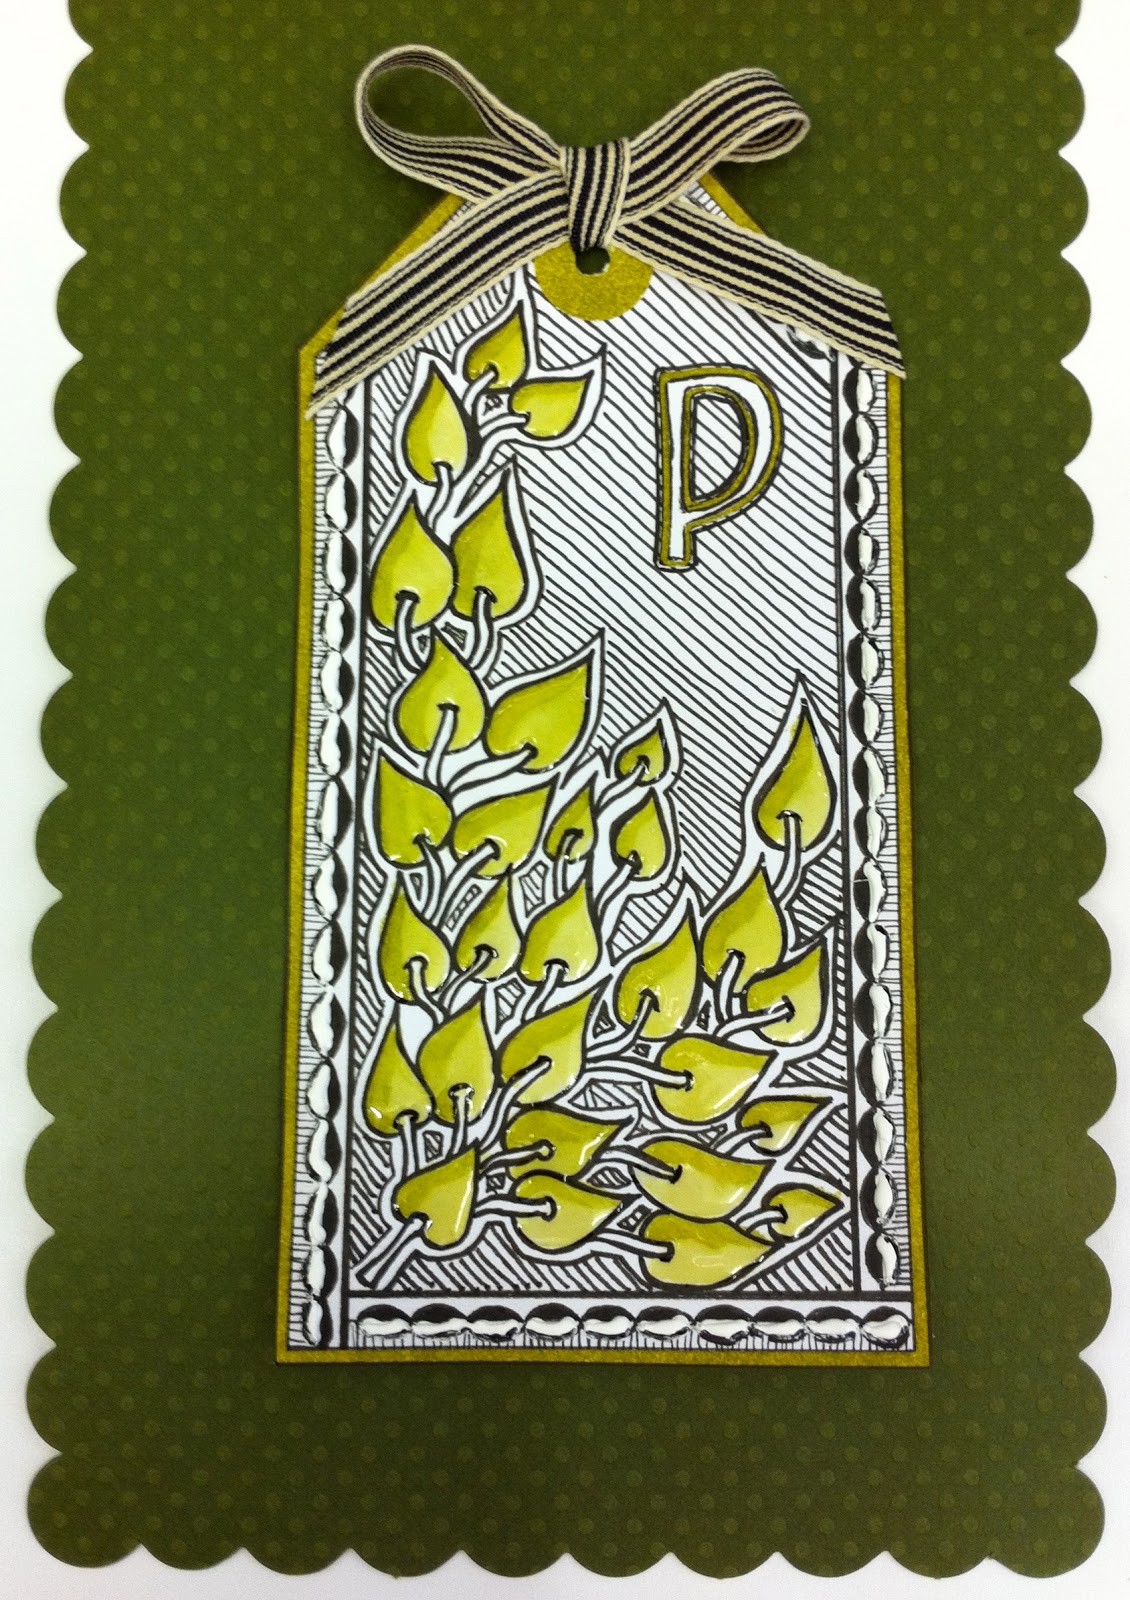
It's the letter 'P' this week so I am sure there are going to be some funny posts over at Tag Tuesday. I think the hilarity us Brits find in funny phrases that occur when talking about the letter P is typical of our humour. It reminds me of those wonderful old seaside post cards. Just a touch naughty and a lot childish fun!
Dare I say 'My P is green this week!!! ;-)'
I blame it on the Peeled Paint Distress Ink! My Zentangle patterns are: around the border PIA and in the centre POKELEAF. I kept it simple today as I liked the natural looking leafy pattern and wanted to feature it. I added colour and glossy accents to the leaves and I tried adding a little texture to the border pattern with white PVA glue. It's not as perfect as I would have liked but it did add another dimension to my tag.
I am off to work on a piece I want to enter into a challenge and to finish editing a video tutorial for a fun paper bow I learnt how to make at the weekend. I just got my 25th subscriber over on my You Tube Channel so I am all excited this morning.
Wishing you a wonderful day and thank you for popping by X
Running a bit late again this week. I am blaming it on the Easter holidays!!!! It looks like Spring is finally threatening to arrive in my neck of the woods. The weatherman is forecasting the weekend for a significant rise in temperatures and cold, rain and snow before then!!!! Talk about hedging your bets. I have another yellow tag this week before I move on to the green family of distress inks. It is definitely a cold acid yellow which is my least favourite shade of yellow which is odd as I do usually tend to favour the colder tones of most other colours.
My Zentangle patterns this week are on the left of the main tag a pretty one called NETTING on the right one that takes ages NINJA STARS! The little tag on the bottom is NIPA and the top little tag turned out to be my favourite pattern this week NZEPPEL. I think it has made the tag look a little bit bowed. What do you think? It definitely looks more complicated than it was to draw. If you are keeping up with all the tag art being shared at Tag Tuesday then click on the link!
I am off to learn how to add a Pay Pal button to my blog. If I master it I will be able to sell my patterns and video tutorials direct from my Blog - that would be cool.
Hope you are having a great week. I am hoping to announce a giveaway next week so keep popping by!
I can't believe it is the letter M already. Half way through the alphabet and 13 weeks into the year - time flies when you are having crafting fun.
The Zentangle patterns I tried my hand at this week were on the strips MEER and on the flowers MUMSY. As I ended up with a lot of white space on my tag I decided to add a bit more of the lovely Scattered Straw Distress Ink and used my water brush to fade it out into the centres of the shapes and also added a touch of colour on the petals of the white flowers. I coloured my ribbon to match my tag as I did not have a ribbon in this lovely creamy shade of yellow.
If you want to see more tags then please follow this link to Tag Tuesday. Why not play along.
Take one well loved and used Tattered Florals die.........
And a bit of die cutting, inking, light distressing and layering later!
I just had to join in this wonderful challenge. It is testament to why the Tattered Florals die is such a hit with us all. So many beautiful ways to use it. So many gorgeous flowers to be fashioned. Hope you like my Chrysanthemum made from many layers of the daisy die (tutorial coming soon to a blog near you!). It is a labour of love but I think it is worth it. I used Shabby Shutters Distress Ink, Tattered Leaves and Vintage Lace dies, some Cream card stock and a sheet of Graphic 45 Little Darlings paper to turn my Chrysanths in to a pretty card and a cute trinket box. I have one Chrysanthemum left and I was wondering if I could spray it with some form of varnish to make it more durable and perhaps turn it into a broach or corsage style bracelet.....watch this space!
Is it Tuesday again already! How time flies. I think it is an age thing. ;-) Here are my tags for this week and finally I am all caught up!
My D 'catch up' tag is all bejewelled and one side of the tag as black pen on white card and on the other side has white pen on black. This was quite fun to try and makes you think a bit more about what you can do with your Zentangle patterns. The patterns for this tag are from the top - Demi, Daggerly, DL Sunray and Drip Drop.
My H tag was entirely worked on Black and it looks very striking on the red background. The patterns are on the left - Hypnotic, the ribbon is Half Onions and on the right of the tag is Hibred. Some of the pattern names are fab - Who knew Half Onions wouldn't make you cry!!!
As I promised last week this is the back of all my tags so far. I am making a lovely Distress Ink Rainbow and I have recorded all the pattern names so that I can use them again one day. I have a plan to display my tags but I am keeping that under wraps for the final week of this fun Tag Alphabet.
Hi everyone. Here is my tag for this weeks letter F and a catch up letter B tag. All the main patterns on each tag begin with their letter. F Tag has examples of Funls, Flukes and Flutter Tile and B Tag has Bales, Black Box, Boomerangs and Barberpole. I am really enjoying trying out some new Zentangle Patterns. If you are looking for a great library for hundreds of patterns and tutorials then follow this link!
This weeks F Tag has added flowers and bling and is mounted on one of the new Distress Ink Colours 'Picked Rasberry' - yummy and the B tag just had to have Butterflies and Bling!! It is mounted on another new colour in the Distress Ink range 'Shaded Lilac'.
I am pleased to announce I finally completed my collection of Distress Inks this week and am feeling the need to start collecting the Distress Stains. I am finding them very useful for inking the edges of things and I also love to splat with them. Very therapeutic at the end of a stressful day. Don't ever splat in a white blouse though! ;-(
If you just happened by then I should let you know I am part of the Tag Tuesday Team and for 26 weeks we will be working on Alphabet tags. If you want to see the huge variety of art that a letter can inspire then please pop along and follow this link to Tag Tuesday!
This is my first Tag Tuesday post this year. As more and more of my time is spent on my new business I wasn't sure if I was going to be able to be part of the lovely Tag Tuesday team this year. I didn't want to give it up but I knew I couldn't spend the time I did last year having fun with all the 3D tags I made. Then thanks to some inspiration provided by fellow tag team mate (sounds like we wrestle!!) Arnold when I visited his blog and saw a lovely zentangle card he had made I knew what I wanted to do for the Alphabet theme. I am late out of the starting blocks I know but here is my E tag and my catch up A tag!
Zentangle Pattern Alphabet Tags
I am going to work on a Zentangle Pattern Alphabet! I am fairly new to Zentangling and I do enjoy the relaxation of it. I need more practice and I need to know more patterns and so each of my tags will feature patterns beginning with the letter of the week and I will catalogue them on the back so I can find them again if I want to use them on a project. I am also going to use my Distress Inks to create a rainbow effect when all my tags are gathered together.
I am not sure how I am going to display them yet but I was thinking a carousel or hanging rack so I can leaf through them easily.
I was going to have a coffee and go and see what my fellow tag artists over at Tag Tuesday have been up to this week but I have to go mop up a plumbing leak first!!!! As I was typing this there was a strange banging noise and water is coming through the ceiling in the Downstairs loo. A radiator has rusted through in the bathroom upstairs and has sprung a leak everywhere :-( Can you believe it???? It would happen just as the weather has turned icy again???? Deep breath - good job I did all that zentangling and I am calm, I am calm, I am calmish........I am fed up that my coffee is going to get cold and me too if we don't get the heating back on soon!!!!!
I, like many other crafters I know and virtually know, love my collection of Distress inks. I have lovingly labeled them and they sit before me everyday all nicely colour coded and ready for action!
As you can see I am also in the process of making a holder for all my foam applicators. This I must hasten to add was not my idea but that of a fellow WOYWWer. I didn't think at the time I thought ....'I want to do that'.... to make a note of their name so consequently I can't give proper credit here but if it was you and you happen to be reading this then please email me as I would love to give credit properly.
I say I am in the process of making my foam applicator holder because I do have a rather distressing problem! As you can see I have 3 blank spaces on my holder on the right because I missed the Autumn Seasonals that Tim and Ranger brought to us. I have been keeping my fingers crossed to see if they will be reissued but alas I have heard nothing so far. How distressing is that! I have an incomplete set of inks and a part finished storage project.......I know you feel my distress my fellow collectors out there ;-)
Anyway to cheer myself up a bit I decided last week to make a project putting my collection to good use. At first thought I would use all my colours but upon reflection and after a few design decisions I decided to select my 12 Distress Ink colours of the rainbow!
Look at those lovely labels! This project is an homage to the wonderful colour pallet we collectors have at our fingertips everyday! Whilst it is not a project that is in the slightest bit distressed, grunged or shabby I hope you like it!
Now I know that some of you may be thinking I could have done this with coloured paper and that is true but then I would not have had the pleasure of getting thoroughly inky whilst making my Distress Ink Rainbow clock.
This project did take a while as there is a lot of snipping involved but I am really happy with how it turned out. I like the fact it is a bit arty and a bit sculptural and definitely bold! If you would like to make your own clock then I will be posting a tutorial shortly so watch this space.
Oh....and just incase Tim Holtz happens to pass by (no laughing!) and just happens to read my blog and just happens to think there may be many more like me out there in blogland in the same distressing situation with an incomplete collection............please, please take pity on us (me) Tim and reissue the seasonals!!!
What do you think my chances are!!! ;-D Don't ask, don't get right!!