This blog is a record of my creative journey. I love to share my passion for paper crafting so I design projects and then create tutorials and workshops to show you how to make them. Please feel free to wander around to check out all the things I share both here, in my ETSY shop and over on my You Tube channel. Thank you for popping by!
Over the coming weeks I will be bringing you tutorials I videoed some time ago. Because video files are so large from time to time I have to move them on to an external hard drive and these are the ones I have forgotten!!! So I am dusting them off and editing them and I hope they are useful tutorials with fun ideas for you to try or adapt for your projects.
This first tutorial has a fun rag daisy embellishment that I know you are going to be able to make and use to embellish a whole host of crafting projects.
This card can be made in any colour combination - Navy and white - Cream and Pink…it is up to you all you need is card stock and a matching ink - combine that with a flower background stamp, a fun greeting or two, a butterfly stamp and some die cut foliage, etc. These are all things you will have in your stash I am sure.
Add a strip of fabric and a needle and thread and you too will soon have a lovely summery card like this one. Next to these card photos I found a photo of this little (not so little) beauty. I wonder if the cake inspired the card or the card inspired the cake?
Either way I enjoyed making them both!……..and eating the cake of course ;-)
YUM! Now I am hungry. But off to check out my archives again so I can bring you another tutorial very soon…..but for today here is the tutorial.
Hope you are having sunny weather or are making sunny projects….or both would be perfect. Until next time, thank you for popping by X
Thought I would share another tutorial today that matches the sunny weather we are having here today! Mind you it is very chilly out there despite the sun - I believe our weather system is drawing down cold polar air…..someone needs to tell Mother Nature we are expecting spring weather round about now ;-)
So for those of you newly popping by I am in the process of waiting to see if I make it on to the Graphic 45 Design team…..I am convinced about now that someone is slowing down time so I am going to fill it with crafting and gardening this week to see if I can't speed it up a little.
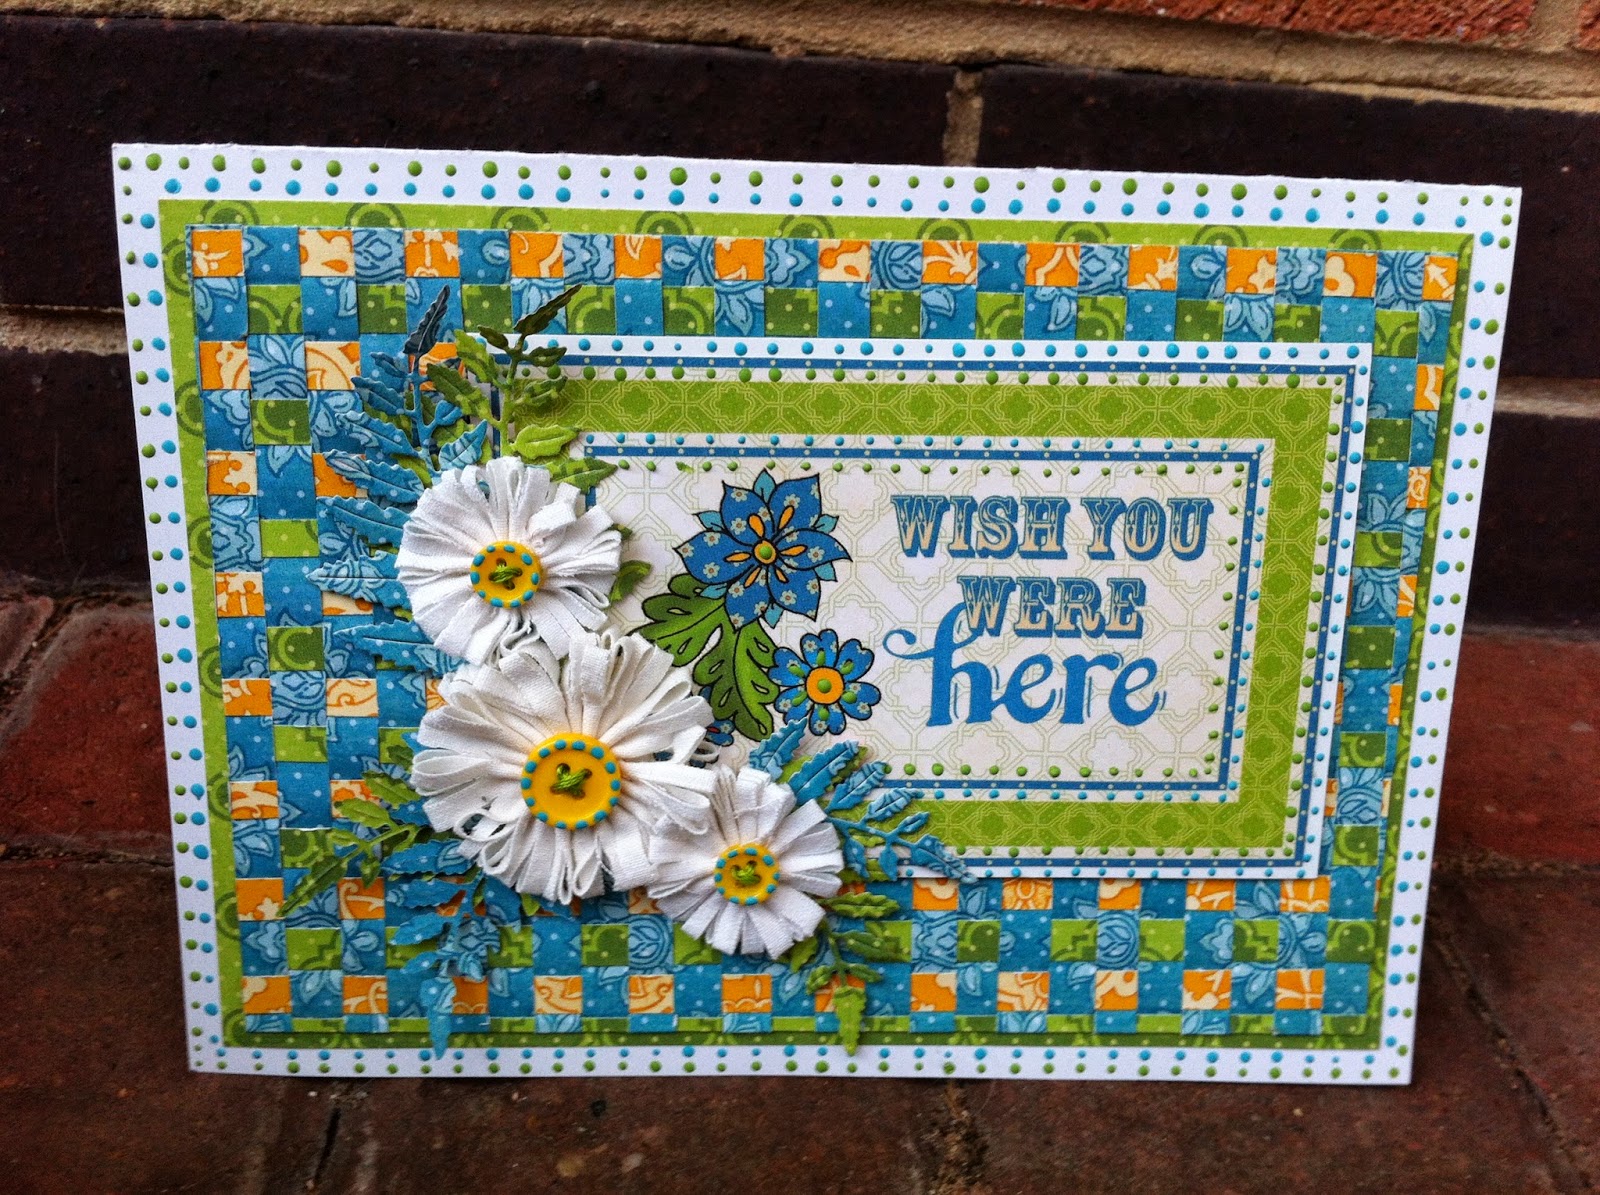
For my round one submission I made several new projects and as usual they were all videoed to turn into tutorials to share with you all. I thought I would share this fun, bright and breezy card today that was inspired by the sunny patterns of the Graphic 45 Bohemian Bazaar paper collection.
In the tutorial I show you how I created the pretty paper woven background for this card as well as how to make a quick topper with the fabulous journalling cards that come in the Graphic 45 Paper collections. This is just one of their many uses.
As usual I had fun making the inner as fabulous as the outer using some Tattered Lace dies which I borrowed from my Mum! Thanks Mum x
I also show you how to make some gorgeous fabric daisy embellishments which work perfectly with my bright and breezy papers.
I know this card will make anyone smile when they receive it on their special day. If you don't have Bohemian Bazaar papers in your Graphic 45 Collection I know that you can make this card in any of the paper collections you have treated yourself too. You might need to change your accent card and perhaps make the flowers in a different colour but I know that this will look great whatever you choose to use.
Cutting Guide Using Graphic 45 Bohemian Bazaar papers:
White Card: 11 1/2" x 8" scored and folded at 5 3/4" and used in the landscape position.
'Wish you were here' card topper taken from the Lap of Luxury paper
White card mat for topper: 3 3/8" x 5 1/4"
Green Vivid Splendour: 5 1/4" x 7 1/2"
Blue Jasmine Nights for inner: 5 1/4" x 7 1/2"
White Card for inner: 3 1/4" x 7 1/4"
Woven panel in the tutorial was created originally at 5 1/4" x 7 1/2" but was later trimmed down to 7 1/4" x 5"
I suggest you work with these new measurements to avoid that step!
One piece of Blue Jasmine Nights for base of weave 7 1/4" x 5" see tutorial for guide to cutting.
The woven strips were cut from the Green Vivid Splendour and Yellow Bohemian Bazaar papers.
The strips measure 7 1/4" x 1/4" cut approximately 8 of each colour.
The Daisies:
Cotton fabric strips for small daisies: 1" x 4" (cut 2)
Cotton fabric strip for large daisy: 1 1/2" x 6" (cut 1)
I hope you find all the techniques in the tutorial I am sharing today useful and that you are inspired to get out your Graphic 45 papers and to get weaving - these panels would look great on cards or scrapbooking pages and I am sure on lots of your paper crafting projects too!
I'm off out to walk the dog in the sunshine now but I think I am still keeping my coat on……'Cast not a Clout 'till May is out,' as my Grandma used to say! Brrrrrr See you again soon and thank you again for all your good wishes and messages of support. Sending you all big hugs - Thank you for popping by X
The Daisy Projects is the latest (third) item to arrive on my virtual shelves! Learn how to make a fabulous Daisy Embellishment (Video Tutorial 1), Gift Box (Video Tutorial 2) and Matching card (Video Tutorial 3) and if that wasn't enough the photo instructions that come with the tutorials show you how to change the Daisy into a Gerbera! All this for the bargain price of £3.50. You do need to have or have access to being able to use the Tim Holtz Tattered Florals and Tattered Leaves die to make this Daisy.
I hope you like the projects enough to buy my tutorials and join me in my virtual classroom. The beauty of my lessons are you can take them any time, in any country and you can pause me anytime you like to take a coffee and cake break! Oh and I will not mind one bit if you make me repeat myself over and over again! ;-)
I am trying to get PayPal buttons to work on my blog but they are still on trial at the moment. I hope to be able to try them at the weekend on a different computer to make sure they work so in the meantime if you want to buy this tutorial click on this link to my ETSY shop!
Take one well loved and used Tattered Florals die.........
And a bit of die cutting, inking, light distressing and layering later!
I just had to join in this wonderful challenge. It is testament to why the Tattered Florals die is such a hit with us all. So many beautiful ways to use it. So many gorgeous flowers to be fashioned. Hope you like my Chrysanthemum made from many layers of the daisy die (tutorial coming soon to a blog near you!). It is a labour of love but I think it is worth it. I used Shabby Shutters Distress Ink, Tattered Leaves and Vintage Lace dies, some Cream card stock and a sheet of Graphic 45 Little Darlings paper to turn my Chrysanths in to a pretty card and a cute trinket box. I have one Chrysanthemum left and I was wondering if I could spray it with some form of varnish to make it more durable and perhaps turn it into a broach or corsage style bracelet.....watch this space!
This week I have on my desk for your perusal a layout I started at a crop on Saturday which I finish yesterday. I have a card that was inspired by the paper roses I made for the layout, two samples for the template I have just put in my internet shop and all the halloween bits and bobs waiting for a box to magically appear and tidy them away!! Will it arrive before Christmas I wonder!
Here is a close up of the layout. I bought some fab papers from Jacqui at Crafty Island. I loved the bright colours and they went perfectly with the Fun Fair photos - my little boy with the big Candy Floss is now almost 14 so it has taken me a while to scrap these!!!! Just waiting for the perfect papers.
For a while now I have wanted to make you a video to show you how much I have learnt from the first one I took with my phone so I made a card with the same Cratepaper 'On Trend' papers that I used on the Layout and thought I would feature how to make paper roses in the tutorial. So here is a close up of the card for those of you in a hurry.....
.......and if you have 10 minutes to spare here is the video tutorial. Hope you like it. These roses are so easy to make and look so effective.
Hi everyone, thank you so much for the wonderful comments last week. I am enjoying these challenges immensely! A chance to make mini works of art and a theme to send you spinning in different directions every week!
This week it had to be the dragonfly for me. I just love their iridescence and to see them flitting above the water. Hearing the hum of their delicate wings as they skim the sparkly surface of the river.
I am making a set of workshop videos for this tag as I wanted to share how I made the Lily (no punches required) and my dragonfly. The first one I made was too big so I am going to pop him somewhere in my craft room. The tutorial will appear in my Etsy Shop soon so pop back if you are interested.
My dragonflies wings are made from some kind of spongy foam sheet that they put between crockery when they pack it. It was perfect for the gossamer wings. I want to try to make flowers with it next.
Another view to show the dimension of the tag. I found these cute little beads in my stash that add great texture to my watery tag. The sprayed background tag was one I discarded from last week as it was lighter than I wanted - this week it was perfect! How's that for being green! Off now to have a leisurely look at what you have all been making for this weeks Tag Tuesday. Follow this link for more tag art inspiration.
As I have been learning to Blog I have been finding more and more interesting things that everyone is doing out there in Crafty Blogland. I particularly love all the challenges I keep finding. As anyone that knows me will confirm I love a crafting challenge!!! It is like a creative workout - wish I relished a physical one as much. I'd definitely be slimmer if I did :-)
I was thinking of entering a challenge I had spotted whilst pottering around in Blogland and as you know if you have popped in to visit me recently I have been working on card designs using up playing cards I had squirrelled away (for far too long to admit to!) If you want to see the other designs follow this link and then this one!
Here is a close up of one of the flowers. I love the way my flower centres worked out. I had laid my design out and was trying to decide where I could put a greeting as there wasn't really much room when I thought I could put the greeting on the flower centres. I printed out my greeting circles and cut them out before running my embossing tool around the edges of them the shape them into a cup shape. I attached them to the flower centres and gave them a liberal coating of Glossy Accents.
I have to do some work on my website today. I have been putting it off as I am finding it hard to write the text. I think I just have to do it and then update it if I need to. Otherwise I am in danger of having a great looking website with no words at all!! Stop stressing and start doing I think. Wish me luck!
Hope that you are having the same lovely sunshine as we have here today. I have been out in the garden and have finally put in the poor daffodil bulbs that have been valiantly trying to sprout in their yellow string bag in the green house!!
Poor old bulbs! I feel guilty as they should be looking like this about now. Will I get my new daffodils in the summer I wonder!!
There are lots of signs of life in the garden now and it was lovely being out in the sun with the birds singing. I hope it stays nice for the weekend as we want to dismantle a leaking water feature and it is a bit of large job. There are quite a few shrubs that could do with moving to roomier positions and I think they are going to be difficult to get out. But thats another job for another day.
Being in the garden inspired me to make a card with flowers on - back in a bit..........
Hope you like the card. I layered up some Kanban papers for the background (Deco Milano and Tartan) and a little black card to add some impact...oh and the always useful Craftwork Cards sentiment. A bit of ribbon to keep the bunch of snowdrops together and pin flair glue gel to keep the flower heads in place a couple of gems and I finished these flowers much cleaner than when I was planting daffodils!
Here is the card we made in a class I taught. I love making these snowdrops. In fact I love making paper flowers full stop. I designed the snowdrops when I was trying to make different types of flowers from paper for the class. I love using the Tim Holtz Tattered Florals die for this. It has such a good variety of petal shapes and sizes that I managed to make paper Irises and Chrysanthemums too. I need to have a go at a daffodil next time I think. I can do the base of the flower it is the cup shaped centre that poses the problem for me.... and the postman if I manage it!!