Tuesday, 31 July 2012

Tag Tuesday - Mermaids


I was really looking forward to this weeks theme as I love the thought that mermaids might exist almost as much as the possibility of fairies!

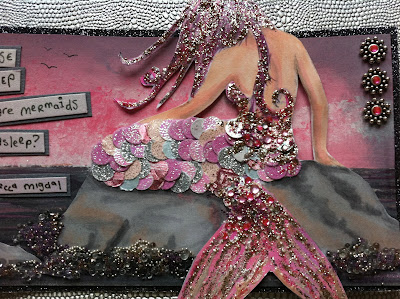
I made a mermaid tag a few weeks ago now and I knew I wanted to make more along the same lines.  So first I made this pink mermaid enjoying the last of the evening sun.  I really enjoy being able to go to town with glitter and sparkles!   I had so much fun that I couldn't help myself and so I made........


Another one!!  This one was inspired by the quote on the first one.  I found a fab Mermaid Lullaby and quoted one of the verses on the top tag and so I decided to make one of those 'Mermaids Fast Asleep' on my second tag.

I took a few pictures as I worked so you could see how I made my tags.


First I sketched out a mermaid using an image I found on the internet and then coloured her using Pro Markers.  I used a blank tag to make sure that she was to scale.


I tried to make a background using Distress Ink (top tag).  I wasn't quite happy with the colour so I tried again with acrylic paint and I liked that much more so I used that one.  I added some inking round the edges with Iced Spruce and then I added some shimmer to the sea with Cosmic Shimmer Drawing Inks which are a fab way to add shimmer in small amounts as they have a lovely fine brush applicator.  They are quite good for the arms too as you have to shake, shake, shake them to distribute the shimmer.


Next I rooted through all my scraps of paper to find all the pink and white shimmer bits that I could and then I used a hole punch to make lots of pretty scales.  I have cut out my mermaid and added pretty iridescent paper to her tail and added some shimmer to her hair.  Then I began glueing on the scales all the way up my mermaids tail.  I know this is a little time consuming but it is well worth the effort as it looks fab when it is done.


I felt I needed to add a frame to my tag so matted my tag on black glitter card.  I mounted my mermaid with foam pads and then I get free rain with the glittery goodies!  I used lots of different colours of Stickles to embellish my mermaids hair and tail and then I added pink and white tiny jewels and I found some micro beads in silver and purple in my stash that looked great.  I think these were originally from when I did some decoupage and they were used on the flower centres.  I had forgotten I had them so it was great to get them out and actually use them again!  I then made magical waves around the bases of the rocks with pinflair glue gel and more micro beads and some of the larger clear glass beads I have been using of late.  Then it was just find a quote and add it with some pretty colour coordinated fibres - Finished tag number one.


Starting the process all over again.  Pro Marker coloured sketch.


This time I was happy with my Distress Ink background and used Chipped Sapphire and Broken China.  I then splattered with water and then finally a light spray with Blue Pearl Dylusions spray and my Deep sea background was complete.


Embellishing with blue scales this time and so on!

The next couple of photos I have added in as they show up the sparkles better.  The top finished photos were taken in Artificial Light and the following ones were taken in daylight.  I am gradually getting to grips with what works best to show off a project - learning!  My light box is 3 light bulbs away from being finished.  They are on order from Amazon so I am looking forward to more experimentation with my photos when it is ready to use.


I coloured 3 sea horse charms with a blue Promarker and then rubbed on some sparkle which worked nicely as these were a bright yellow colour originally!


I made a hair bobble with a shell and added a couple of tiny ones next to the clam shell.


Did anyone else buy this snakeskin paper many moons ago.  It makes a great background to pose my tags on.


A couple of little metal spacers and pink jewels just for fun!

One final photo to share with you........


Who knew how much mess two tags could make!!?  You'd think after using all those pretty sparkles it would have looked a bit prettier on my desk.  As you can see in time honoured crafting fashion I had all this space to start with and ended up working on a postage stamp sized work area!!

Guess what I am off to do now?!  If you want to see the first Mermaid tag that I made a couple of weeks ago then follow this link.  If you want to see even more fab mermaid tags then follow this link to Tag Tuesday.

Thanks for swimming by!

Sunday, 29 July 2012

Now What Shall I do with it?......


This is a Prima Paintables that I have had for a very long time.  Long before we knew about Pro markers but it was they that finally turned this pretty black and white pattern into the above.  I, like many of you love to colour in and Pro markers and other similar pens means we can indulge a childhood love with a grown up result.


 I had a lovely time as you can see.  The only thing I will say is that this paper is very porous and it was a bit difficult to blend as the alcohol of the markers dried very quickly indeed.  But still I was happy with the result.  I have done nothing with it until today.  I recently did a spot of tidying that resulted in a whole heap of layouts waiting for something to be done to them so they could finally be finished and find homes in albums.  I know you will relate to me here.  UFOs  UnFinished Objects (not my phrase but I heard it recently).
So I decided to finally do something with this - but what?  I decided it would be a layout and here is what I did.


First I trimmed a little of the edges off the sheet so that I could frame the page with a dark grey.  I also gutted the Grey 12 x 12 so I could use some of it to frame my photos (just call my thrifty!).  I then inked my Prima page with Iced Spruce distress ink.


I had already decided I wanted to make more of a feature of the flowers so I cheated a little and photo copied the flower section so I would have some images to decoupage later.


It took me a while to find the right images to put on this page because I didn't want to loose too much of the flower design and equally did not want to overpower my photographs.  Eventually I decided on these too images of my Mum and Dad.  My Dad absolutely loved photo booths and our family has loads of these strips of photos from one trip out or another.  We always had to pull a funny face on at least one of the photos!  This strip has one image missing - I am not sure why.  The large photo was taken at a Regimental Cambria Ball.  My Mum still has this dress.  It is a gorgeous orange colour.  My Mum and Dad were presented to the Queen that afternoon after a huge parade of the Regiment (tanks and all).  You may think this is a strange photo combination one so formal and one definitely not but read on......


I happened to have a reel of ribbon on my desk that I thought might go with this layout and tried making photo corners with it.  But something about it wasn't quite right so I left it out.  I don't think it was delicate enough.  Listen to your instincts as you work putting layouts together.  If you are not sure you probably shouldn't!


I wanted to sit my photographs into my page so that I didn't cover up too many flowers (so lovingly coloured in by me!!).  So I cut around some of the swirls and a butterfly to tuck the photo strip behind.


It works quite nicely as a technique.  I have used it before on other fancy papers I have bought.  It takes a little while to cut around things with a craft knife but it is worth it.


I repeated the process for my large photo.  This was a little trickier as there was a lot more image in this area as you can see so I worked out which bits would frame my photo rather than obliterate it and then cut around those bits.


When I was framing the photograph with grey card I noticed this writing on the back of it.  It was written by my Grandma.  My parents sent her this photo many years ago and it has since come back to me.  I was careful not to put tape over it.


It took a little bit of manoeuvring to get this photo into place as I had sticky tape and flowers and leaves to contend with but I got there.


Next up was a bit more fussy cutting to add more flowers and butterflies (from the copies I made earlier) and I layered up some of the flowers in the centre of the image.  I think you can just about see it in the photograph.  I also added some tiny jewels for a bit of sparkle.


As I put this together came up with a title for my layout and I also had already drafted my journalling.  I used some tiny wooden letters, which I coloured to match my layout with Pro markers, for the title and I journaled down the side of the photo strip.

I have just been on the phone to my Mum and told her what I have been up to so..............

Hope you like it Mum!

Wasn't the Olympic Ceremony fab?  I loved the Britishness of it.  There were some great moments of wit and wonder - Love that James Bond escorted the Queen to the stadium and the the cycling doves wings were stunning.

The heavens have opened so I had better go and let the dog in!! 

Hope you are all having a fab weekend X

Wednesday, 25 July 2012

WOYWW 164 - Summer is finally Here!


Sorry about the funny angle of shot!  I have a few things on my desk waiting to be put away today (weather permitting!).  I finally got down to a bit of journalling to finish off a couple of layouts that have been sitting patiently on my desk for a few weeks now as you know!  They have had things piled on them several times but here is three that escaped to the put it in an album pile!  You can also see the remainder of the layouts to be finished pile over yonder so I have a way to go yet!  I will intersperse Layout finishing with a bit more of the 101 Course.  The inks are still waiting.  I think I have a colouring with distress inks tag and a sprayed tag using home made distress ink sprays to try next.  That is about it.... oh, except a couple of teeny tiny shells that I have to put away after finishing a tag yesterday and my first 3 Christmas Cards this year.

A few close up shots for the details!


I went to visit my Mum and her sisters (my Aunty Jean and Aunty Margaret) last Wednesday and this is what I ended up making.  I loved using my Mum's snow flake punches.  That punch all over the page one was very cool!  3 down 97 to go!!!


This LO finally has its journalling.  I really like sanding photos and it worked perfectly with these Kay and Co papers.  Me and little Damian at the beach.  Damian is now 29 and a strapping 6 footer!  I am the same height, have the same hair do but I am wider!


This LO is of my hubby before we started courting.  We started dating 32 years ago and celebrate 30 years of marriage in December.


This LO is of our first date which was on my 18th birthday.  We lived in Cyprus at the time and we had a huge Meze with my friends from school - some of my brothers friends and some of my parents friends too.  We didn't know it then but Ivan and I went on our first date with both sets of in laws!


Here is a LO I want to do this week of my Dad who boxed for the Army - these are his Regimental Colours though I think I will do the Layout on White or Cream and just embellish with these colours.


Thanks for stopping by to visit me.  I am going to do a spot of visiting in my PJs (hope you don't mind!) whilst I have my morning coffee then I am out into the sun and the garden for some much needed vitamin D.  Yipee the sun is finally shinning here in the UK!  

Tuesday, 24 July 2012

Tag Tuesday - Rock Pools


Hi everyone - hope your having fun in the sun.  I wish I could dip my toes in a rock pool right now!  Preferably one without sea urchins in it though :-D

Thank you to everyone that has been watching the progress of this tag.  I really appreciate your kind words and encouragement.  I think it worked!!!  I am so relieved the glossy accents worked....phew!

If you want to see a step by step of how I created my rock pool then please check out my blog to see how I made kitchen roll rocks, paper dust seaweed, Fimo sea creatures and glossy accents sea water.  A big thanks to Tag Tuesday for the fabulous inspiration.

My final steps to finish off my tag were to dye a strip of American Seam Binding with Walnut Stain, Broken China and Rusty Hinge Distress inks (you can't see much of it in the photo!)  I added a few rock pool inspired words and a couple or four paper fussy cut seagulls - You may recognise one of them from a previous tag!  Please don't eat from my pool boys.... well not until I post this photo at least!

It took me a while to get a good photo of my tag because of the reflections but I think this was my best shot.

Thanks to everyone for your lovely comments last week.

Follow this link to see more lovely Rock Pool inspired tags over at Tag Tuesday.

Monday, 23 July 2012

Filling the Pool

It's sunny outside and I really should be gardening as I have a water feature with a real pool waiting to be finished off now the weather is finally nice (touch wood!)  But you know how it is I just had to get to the fun part of filling my rock pool to finally see if this is going to work.


I realised I had to take all my creatures and sand off my tag so I could cut my tag out!  That done I had a bit of touching up to do at the edges of my rocks with more brown paint and I also inked the edges of my sky with Faded Jeans.

I decided to try baking my Fimo pool life with my heat gun and it worked perfectly once I managed to pin them down with my pokey tool!  The first blast of hot air sent mussels and sea urchins flying all over the place!  One of those....'That was obviously going to happen' moments!

Next I put a layer of glossy accents on the bottom of my pool and sprinkled the sand back in place and my now baked pool creatures.  I added a few paint highlights and textures and glued on some shells and starfish onto my rocks. Oh and I dropped in a few of those micro glass beads that seem to work so well were there is water.


Once I was happy with my composition I filled my rock pool with glossy accents and rubbed some of it on to the rocks as I think they would be a bit wet because the tide has only just gone out revealing my rock pool with all its treasures!

This seems like a good place to stop so the 'Final Reveal' is tomorrow.  Also I can't do anything until my Glossy Accents dries.  So far so good - so now it is just a case of keeping my fingers crossed that it dries completely clear so we can see all the little creatures.

Looking at this photo I think I need something else but I am not sure what.  Definitely ribbon and words and something.  I will PONDER that out in the sunshine!!!!  Couldn't resist that one :-D

See you tomorrow x  Have fun in the sun if you have some!!

Sunday, 22 July 2012

Painting Rocks and Making Pool Life!


Carrying on from my post yesterday, my rocks have been sitting in the sun all afternoon.  The sun has gone behind the trees and I think my tag is dry.  The thickest rocks at the front may still be a little damp but I am going to wet things again when I paint so I am going for it!


I squirted a tiny drop of Broken China refill ink on my craft mat and added a little bit of water and then brushed it across the sky area of the tag.  While it was wet I took a dry piece of tissue and lifted some of the ink to form fluffy clouds.  This worked really nicely and I will do this again on other projects.


Before I start painting I looked for some reference images on the internet and print them out.


I also remembered that I had some really tiny shells stored away in the attic (not sure why they are up there!)


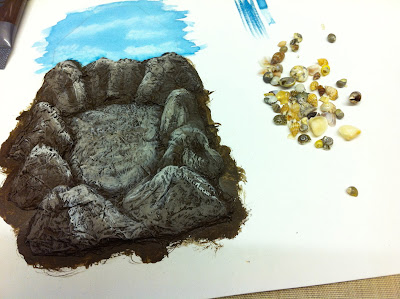
This afternoon when my tag was drying my hubby said, 'Yuk what is that soggy toilet roll for?' and if he could see this after a coat of dark brown acrylic he would think I have lost the plot!


That's better!  Now it is starting to take shape.  I have dry brushed on a lighter shade of brown.


A shade lighter again and I think that is light enough and I am happy with the shadows that have popped up now with the addition of the lighter paint shades.


Looking at my reference pictures I think I would like to add a bit of seaweed to bring my rocks to life.  I could do with some of that flower soft but I don't have any.  I remember a while back after a heavy session of paper distressing creating paper dust that was not unlike flower soft.  So I took three shades of scrap card and ran my scissors along the edges of them until I had created these three piles of potential seaweed!


A bit of PVA glue and a bit of patience I got an effect I was happy with.  Sorry that my picture is a bit dark.  I'll take a better photo tomorrow in daylight so you can see the colours better.


I sprinkled some sand on the bottom of my rock pool.  The scale is a little out but they could be a bit like shingle rather than sand (artistic licence!)


Next up I had to think of a way to populate my pool but to keep things fairly flat - thinking ahead to how I am going to add the water.  I tried cutting out small images of starfish and things but they looked a bit naff.  Then I thought 'air drying clay' but that had all gone hard as it has been years since I have played with that.  Fimo it is then.  I made starfish, mussels, sea urchins and sea urchin shells.  I think everything is a little bright at the moment but I am happy with how it is taking shape.

That's it for tonight as there is a curry with my name on it waiting next door.  I am going to think about if I should bake the Fimo or not  I might just give it a blast with my trusty heat gun before I add the water to my rock pool.  That is when it could all go horribly wrong.

I'll post again tomorrow.  Fingers crossed I can show you a finished tag and not a 'back to the drawing board photo!!'

Night Night x

Saturday, 21 July 2012

A Work in Progress

Hi there,  hope you are enjoying your weekend.  We actually have some sun today - hooray!  I have been out in the garden all day and have only got half way round with the weeding, tidying and pruning!  It has been going wild out there in the rain.  The sun has gone down so I have come in.

I was just starting work on an idea I had for this weeks Tag Tuesday and I thought you might like to see it as I make it.  I have no idea if it is going to work.  I hope it does!!  The theme this time is Rock Pool and I want to make a realistic 3D one...all on a tag of course.

I decided to make my rocks using a version of paper mache.  I am making the pulp using torn up bits of kitchen roll and artists matte medium.  So here we go for some gloopy fun.


I sketched out my rock pool formation and decided to leave the top of the tag to become sky.  I think this will help give my pool some perspective.  Then I ripped up kitchen roll and added a liberal amount of Artist Matte Medium.  Then I smooshed it all together.


I laid down a very thin layer of pulp on what will be the rock pool bottom.


Then starting at the rock that is furthest away I formed my first rock by squishing and shaping a pile of the pulp into a rock shape.


Repeating for the two side rocks and then moving forward I am trying to make my rocks look like they are in front of each other as I move toward the front of the tag.


Moving down both sides of my pool making more rocks (I don't want my water to escape when I fill it!)


Then to put my final rocks in place.  This is how I created all the rocks but these front rocks are the thickest layer of pulp.  I pile on the pulp roughly at first just to get the right depth of pulp.


Then I wanted to smooth my rocks a little so I finished them by laying on flat pieces of tissue and smoothing it over the rocks.  The tissue soaks up the matte medium and smooths my rock shapes.  I am happy with the result so now I need to put it to one side to dry.  I hope it dries overnight or I will be pushing this tag to finish it by Tuesday!!

Looking at this photo I may opt to trim my rocks down a little at the left side - maybe,  They should cut out alright as they are only tissue.

If I don't post again tomorrow you will know the rocks are still setting - If it is sunny tomorrow I will put them out to bake in the sun!

I am off to see what my son and his pals are up to as they have asked to camp in the garden....and we said yes....what were we thinking?!

While I am blogging tonight I just wanted to say thank you so much to everyone that is following me.  I  really appreciate you being there encouraging me.  I have been blogging for coming up to 6 months ish and I have loved every minute of it.  I have chatted with some very talented and kind bloggers and am making friends which is fab.

See you tomorrow ..... I hope!
Related Posts Plugin for WordPress, Blogger...